

marijuana growing
Unveiling the Magic: Cannabis and Baking Soda
Welcome to the world of cannabis cultivation, where every leaf holds the promise of a thriving harvest. In this glossy, we unveil a little-known secret that can revolutionize your approach to nurturing cannabis plants: baking soda. Prepare to embark on a journey where science meets horticulture, as we explore how this common kitchen ingredient can transform your cannabis garden. Discover the extraordinary benefits of using baking soda as a natural alternative to leaf fertilizers, unlocking the potential for deep, dark green leaves that thrive under the sun. Get ready to witness the magic of enhanced photosynthesis and enjoy a bountiful crop like never before.
Understanding the Power of Baking Soda:
Delve into the science behind baking soda’s remarkable properties and its effect on cannabis plants. Explore the concept of pH balance and how it directly impacts nutrient absorption and photosynthesis. Gain insight into the role of baking soda as a pH regulator, providing stability and optimizing the conditions for your plants to flourish. Learn about the natural compounds within baking soda that promote healthy growth and increased chlorophyll production, leading to vibrant, luscious green leaves.
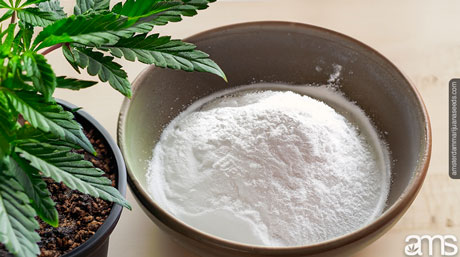
Baking soda, also known as sodium bicarbonate (NaHCO3), possesses remarkable properties that can significantly impact the health and vitality of cannabis plants. Understanding the science behind these properties is crucial to harnessing the full potential of baking soda as a leaf fertilizer alternative.
pH balance plays a fundamental role in plant growth and development. The pH scale measures the acidity or alkalinity of a substance, and cannabis plants thrive within a specific pH range. Baking soda acts as a pH regulator, helping to stabilize and maintain the optimal pH levels in the growing medium.
By adjusting pH levels, baking soda facilitates the absorption of essential nutrients by cannabis plants. When pH levels are imbalanced, certain nutrients become less available to the plants, leading to nutrient deficiencies and compromised growth. Baking soda acts as a buffer, ensuring that the pH remains within the ideal range for nutrient uptake and utilization.

In addition to pH regulation, baking soda contains natural compounds that promote healthy growth and increased chlorophyll production. Chlorophyll is responsible for the green pigment in plants and is vital for photosynthesis—the process through which plants convert light energy into chemical energy. By enhancing chlorophyll production, baking soda boosts the plants’ photosynthetic efficiency, resulting in vibrant, luscious green leaves.
Furthermore, baking soda’s alkaline nature helps create an environment that encourages nutrient absorption and microbial activity in the soil. This can lead to improved soil fertility and nutrient availability, ultimately benefiting the overall health of cannabis plants.
The role of baking soda in optimizing pH levels, promoting nutrient absorption, and enhancing chlorophyll production is at the core of its power as a leaf fertilizer alternative. By delving into the science behind these properties, cultivators can grasp the underlying mechanisms by which baking soda positively influences the growth and vitality of their cannabis plants. Armed with this knowledge, they can apply baking soda effectively and confidently in their cultivation practices, unlocking the potential for lush, healthy foliage and robust harvests.
Baking Soda, A Sustainable Leaf Fertilizer Alternative:
Step away from synthetic leaf fertilizers and embrace a more eco-friendly and cost-effective approach with baking soda. Discover the advantages of choosing a natural solution that reduces chemical dependency and environmental impact. Uncover the simplicity of incorporating baking soda into your cultivation routine, from dosage recommendations to application methods. We’ll explore various techniques, including foliar sprays and soil amendments, ensuring you have the knowledge to make informed decisions for your cannabis garden.
Baking soda presents a sustainable and environmentally-friendly alternative to synthetic leaf fertilizers, offering numerous advantages for cannabis cultivation. By opting for baking soda as a leaf fertilizer, cultivators can reduce chemical dependency and minimize their environmental impact, aligning their practices with a more sustainable approach.
One of the primary advantages of using baking soda is its natural composition. Unlike synthetic leaf fertilizers that often contain artificial additives and chemicals, baking soda is a pure and simple ingredient derived from naturally occurring minerals. This natural aspect makes it a safe and non-toxic option for both the plants and the surrounding ecosystem.
Incorporating baking soda into your cultivation routine is relatively simple and cost-effective. Dosage recommendations are readily available, ensuring that you can provide your plants with the appropriate amount of baking soda without the need for complex calculations. Its widespread availability and affordability make it accessible to cultivators of various scales, contributing to its cost-effectiveness.
Baking soda can be applied through different techniques, offering flexibility and adaptability to suit your cultivation preferences. One common method is foliar sprays, where a baking soda solution is sprayed onto the leaves, allowing for direct absorption. Foliar sprays provide quick and efficient nutrient delivery, making them ideal for addressing nutrient deficiencies or promoting overall plant health.
Alternatively, baking soda can also be used as a soil amendment. By incorporating it into the growing medium, it gradually releases its beneficial properties, benefiting the plants over an extended period. This method ensures a consistent supply of nutrients and pH regulation at the root level, supporting the long-term health and growth of cannabis plants.
By exploring the various techniques and application methods, cultivators can tailor their approach to best suit their specific needs and preferences. This flexibility allows for experimentation and fine-tuning, ensuring that the benefits of baking soda are maximized within individual cultivation setups.
Embracing baking soda as a sustainable leaf fertilizer alternative signifies a conscious choice to reduce reliance on synthetic chemicals and embrace a more environmentally-friendly approach. By incorporating this natural ingredient into your cultivation routine, you can promote the health of your cannabis plants while minimizing your environmental impact, fostering a harmonious and sustainable ecosystem for both your garden and the surrounding environment.

The Benefits of Deep, Dark Green Cannabis Leaves:
Delight in the beauty and vitality of deep, dark green cannabis leaves that serve as a testament to your gardening expertise. Learn how the enhanced photosynthetic capabilities achieved through baking soda application can lead to improved plant health, vigor, and resistance to stress. Explore the impact of optimal chlorophyll levels on nutrient uptake, flower production, and overall crop quality. Witness the transformation of your cannabis garden as vibrant, healthy leaves pave the way for a robust and abundant harvest.
Cultivation Tips and Best Practices:
Equip yourself with valuable tips and best practices to maximize the benefits of baking soda in your cannabis cultivation journey. From selecting the right baking soda product to understanding the ideal application frequency, we provide practical guidance to ensure you achieve optimal results. Dive into the world of organic gardening techniques, companion planting, and integrated pest management strategies that complement the use of baking soda, promoting a holistic and sustainable approach to cannabis cultivation.
-
Selecting the Right Baking Soda Product: When incorporating baking soda into your cannabis cultivation routine, it’s crucial to choose a high-quality, food-grade baking soda product. Look for brands that offer pure baking soda without any additives or impurities. This ensures that you provide your plants with the best possible ingredients for their growth and development.
-
Understanding the Ideal Application Frequency: To maximize the benefits of baking soda, it’s essential to strike the right balance in terms of application frequency. Generally, it is recommended to apply baking soda as a foliar spray every two to three weeks during the vegetative stage of plant growth. However, it’s important to monitor your plants closely and adjust the frequency based on their response. Over-application can lead to pH imbalances or other adverse effects, so it’s crucial to observe your plants’ behavior and adjust accordingly.
-
Embracing Organic Gardening Techniques: Incorporating baking soda into your cannabis cultivation journey aligns well with organic gardening practices. Embrace organic fertilizers, compost, and natural pest control methods to create a sustainable and environmentally-friendly garden. By avoiding synthetic chemicals and focusing on natural solutions, you promote the overall health of your plants and contribute to a more sustainable ecosystem.
-
Companion Planting: Consider incorporating companion plants that thrive alongside cannabis and complement the use of baking soda. Certain companion plants can deter pests, attract beneficial insects, and enhance the overall health of your garden. For example, planting aromatic herbs like basil or mint can repel pests and add fragrance to the garden. Research companion planting options and design your garden to create a harmonious and mutually beneficial ecosystem.
-
Integrated Pest Management Strategies: Pests can pose a significant threat to cannabis plants, impacting their health and productivity. Integrated Pest Management (IPM) is a holistic approach that combines various strategies to control pests effectively. When using baking soda as a leaf fertilizer, integrate IPM techniques such as regular monitoring, proper sanitation, and the use of biological controls like predatory insects. By implementing a comprehensive pest management plan, you can safeguard your cannabis garden while promoting the natural benefits of baking soda.
-
pH Monitoring and Adjustments: Baking soda is primarily used to regulate pH levels in the soil and enhance nutrient uptake. Regularly monitor the pH levels of your growing medium using a reliable pH testing kit. Aim for a pH range of 6 to 7 for optimal cannabis growth. If the pH deviates from the ideal range, adjust it by applying a baking soda solution in small increments until the desired pH is achieved. However, exercise caution and avoid drastic pH adjustments, as sudden changes can shock your plants.
By following these cultivation tips and best practices, you can harness the full potential of baking soda as a leaf fertilizer for your cannabis garden. Embrace organic methods, companion planting, and integrated pest management to create a thriving, sustainable ecosystem that supports the growth and vitality of your plants.

Showcasing Success Stories:
Discover the experiences of passionate cannabis cultivators who have embraced baking soda as a leaf fertilizer alternative. Hear firsthand accounts of their journeys, from the initial skepticism to the awe-inspiring results they achieved. Unveil the tales of robust plants, dense flowers, and exceptional harvests that have propelled these growers to new heights. Be inspired by their success stories as you embark on your own baking soda-infused cultivation adventure.
The Blossoming Enthusiast:
Meet Sarah, an enthusiastic cannabis cultivator who decided to explore the benefits of baking soda as a leaf fertilizer alternative. Initially skeptical about deviating from traditional synthetic fertilizers, Sarah took a leap of faith and incorporated baking soda into her cultivation routine. As she nurtured her plants, she noticed a remarkable transformation. The leaves turned a deep, lush green, and her plants exhibited unprecedented vitality.
Sarah’s awe-inspiring journey reached its peak during harvest time. She marveled at the dense, resin-coated flowers that adorned her robust plants. The aroma was intoxicating, and the potency of the buds exceeded her expectations. With each harvest, Sarah’s confidence grew, and her baking soda-infused cultivation adventure proved to be a resounding success.
The Sustainable Innovator:
James, a dedicated cannabis cultivator, sought a more sustainable approach to nurturing his garden. Intrigued by the idea of using baking soda as a leaf fertilizer alternative, he decided to give it a try. The results astounded him. Not only did his plants thrive with vibrant green leaves, but he also noticed a significant reduction in pests and diseases.
Inspired by his success, James embraced an organic gardening approach. He implemented companion planting, strategically placing marigolds and lavender around his cannabis plants to deter pests naturally. The harmonious ecosystem flourished, with ladybugs and bees becoming regular visitors to his garden.
James’s commitment to sustainability extended beyond his cultivation practices. He implemented rainwater harvesting and utilized homemade compost, further reducing his environmental footprint. His remarkable success story inspired fellow cultivators to adopt baking soda as a leaf fertilizer alternative and embrace a more eco-friendly and holistic approach to cannabis cultivation.
The Resilient Grower:
Mark, a seasoned cannabis grower, faced a daunting challenge when a sudden pH imbalance threatened the health of his plants. Determined to find a natural solution, he turned to baking soda as a potential remedy. Mark carefully adjusted the pH levels, incorporating baking soda into his watering routine, and witnessed a remarkable recovery.
Not only did the baking soda restore the pH balance, but Mark also noticed a visible improvement in his plants’ vigor and leaf color. Inspired by this success, he decided to continue using baking soda throughout the cultivation process. The resilience of his plants was astounding, as they weathered environmental fluctuations and thrived in the face of adversity.
Mark’s exceptional harvest left him in awe. The dense, resinous buds were a testament to the power of baking soda as a leaf fertilizer alternative. Through his journey, Mark discovered not only the benefits of baking soda but also the resilience and adaptability of cannabis plants when nurtured with care and innovation.
These captivating success stories showcase the transformative power of baking soda as a leaf fertilizer alternative. From vibrant leaves and exceptional harvests to sustainable practices and resilience in the face of challenges, these cultivators have unlocked the potential of their cannabis gardens. Their experiences inspire and invite others to embark on their own baking soda-infused cultivation adventures, nurturing plants that flourish with beauty, potency, and sustainability.
Conclusion:
As we conclude this glossy, we invite you to embrace the transformative power of baking soda in your cannabis garden. From its pH-balancing properties to its ability to promote lush green leaves, baking soda offers a natural, sustainable solution that can elevate your cultivation experience. Explore the boundless possibilities, enjoy the rewards of vibrant foliage, and savor the satisfaction of a bountiful harvest. Embrace baking soda as your ally in nurturing healthy, thriving cannabis plants, and witness your garden flourish like never before.
Frequently Asked Questions
What are the benefits of using baking soda as a leaf fertilizer for cannabis cultivation?
Baking soda enhances photosynthesis, promotes deep, dark green leaves, optimizes nutrient absorption, and provides pH balance, leading to improved plant health, vigor, and resistance to stress.
How does baking soda contribute to sustainable cannabis cultivation?
Baking soda offers a natural and eco-friendly alternative to synthetic leaf fertilizers, reducing chemical dependency and environmental impact. It aligns with organic gardening practices, is cost-effective, and can be incorporated through various application methods.
Can you share any success stories of using baking soda as a leaf fertilizer in cannabis cultivation?
Cultivators have reported remarkable transformations, including deep green leaves, dense flowers, and exceptional harvests. Baking soda has helped them achieve vibrant plant health, resilience to pH imbalances, and sustainable cultivation practices.


Discover Cannabis and CO2
Did you know that your plants can be harmed if they don’t get an adequate supply of CO2? Or that an excessive supply of carbon dioxide can potentially be harmful to your marijuana plants? Carbon dioxide is a crucial aspect of marijuana cultivation that can hinder or permanently halt the progress of plant growth. When it comes to supplying your plants with additional carbon dioxide, there are certain factors you need to keep in mind. In this piece “Cannabis and CO2” we will share ways to optimize CO2 levels for cannabis growth.

Why is carbon dioxide essential for cannabis cultivation?
It is essential to ensure that your plants receive a carbon dioxide level above 250 parts per million (ppm). Any CO2 level below this measure can pose immense risk to them. On the other hand, exposing your plants to dangerously high levels of carbon dioxide can be lethal. But why is carbon dioxide essential for cannabis cultivation? It enables plants to complete the process of photosynthesis. Photosynthesis is the conversion of carbon dioxide into energy in plants. As the name and formula imply, CO2 consists of one carbon atom and two oxygen atoms. This is significant because plants require 17 essential elements to grow and reproduce, and hydrogen, carbon, and oxygen make up 95% of a plant’s dry weight.
Many farmers suggest that adding CO2 to the cultivation room could improve yields by up to 20%. However, this guide will show you how to optimize carbon dioxide levels for better weed growth and excellent results.
How to introduce additional CO2 to your garden
There are several methods to add carbon dioxide to your garden. However, many of these methods do not guarantee controlled delivery of the desired PPM. Therefore, we recommend investing in reliable equipment to ensure proper CO2 supplementation.
CO2 generators
CO2 generators offer an effective way to improve the carbon dioxide levels in your plants. These products, resembling outdoor heaters, burn propane or natural gas to produce carbon dioxide. They also emit heat, making them suitable for larger spaces and climate-controlled enclosures.
Compressed CO2
Compressed CO2, stored in metal tanks like propane cylinders or scuba tanks, can be delivered to your plants through emitters. Unlike generating carbon dioxide on your own, compressed carbon dioxide is produced at a factory, eliminating concerns about heat generation. This makes compressed CO2 an excellent choice for small-scale growers.
What does carbon dioxide do for your cannabis plants?
Optimizing carbon dioxide levels for your plants will result in increased growth speed and higher yields. With accelerated growth, you can enjoy bountiful harvests every year, resulting in bigger and better yields without experiencing dry periods. When carbon dioxide is used properly, it increases the moisture content in your plants and enhances their resilience. This enables plants to withstand higher temperatures than they normally would without drying out quickly. As a result, your plants will thrive in hotter conditions, leading to improved growth.

Why use CO2 in cannabis cultivation?
There are two primary benefits of using CO2 in your marijuana plants: faster growth and greater yield. Additionally, plants store a certain amount of moisture and energy in their leaves, and carbon dioxide helps release that energy, allowing plants to blossom. Most cultivators agree that unlocking this stored energy can lead to a 20-30% increase in yield, along with a relative growth speed increase of at least 15%.
What do you need to know before adding CO2 to your cannabis plants?
Adding CO2 will increase the humidity of your cannabis garden, creating a more moist environment. However, higher moisture levels can also increase the risk of fungus and rot. Moreover, uncontrolled release of carbon dioxide can create a toxic environment for both your cannabis plants and yourself. A CO2 level of about 2000 ppm can harm your plants, and levels higher than that can be unsafe for animals and humans to breathe. It’s important to remember that a quantity below 250 ppm will harm your plants.
Since carbon dioxide is heavier than oxygen, it needs to rain down on your plants. Therefore, it’s necessary to regulate carbon dioxide levels to maximize its benefits without sacrificing the oxygen your plants require, and vice versa. In a nutshell, carbon dioxide supplementation will lead to bigger, improved, and higher annual yields.
Indica vs Sativa
Who would have thought that in marijuana there are different types of plants with completely different effects and benefits? The origin, the climate, the effects, and the physical characteristics are crucial in order, to differentiate the type of plant that you are going to use either in the clinical, pharmaceutical, or recreational field, as well as to know between Cannabis Sativa and Cannabis Indica in order, to be able to make the best selection of seeds according to your needs.

Marijuana is a well-known plant for its mind and body effects and it’s split into two main types: Sativa and Indica. Even though they come from the same family and have similar ingredients, they’re different in how they look and what they do when you use them. Let’s break it down simply:
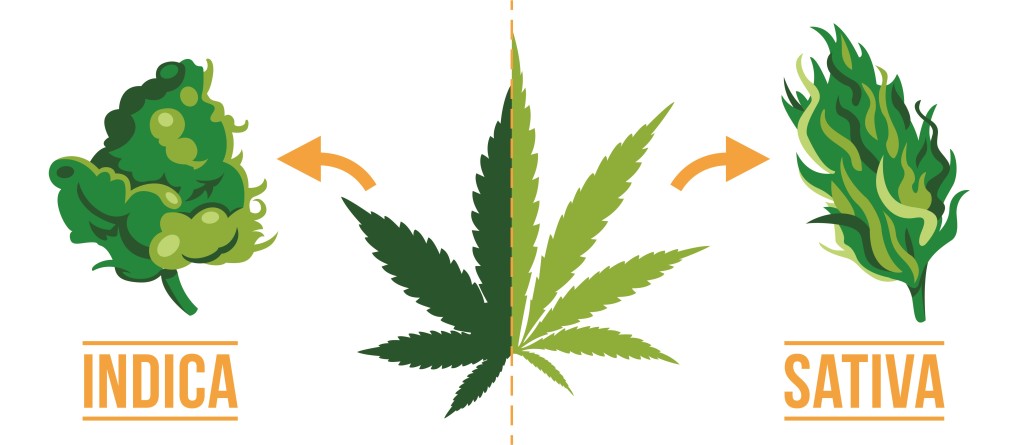
What the plants look like:
Indica: This plant is short and looks like a bush with wide leaves. It grows well in cooler and mountainous areas.
Sativa: This one is tall and thin, with skinny, pointed leaves, kind of like a young pine tree. It likes hot and humid places.
How they make you feel:
Indica: It chills you out and can make you sleepy, like when you’re getting cozy in bed after a long day.
Sativa: It energizes you and wakes up your mind, great for when you need to do things that require imagination or when you’re hanging out with friends.
To put it simply: if you want to relax, go for Indica. If you want to be more alert and active, go for sativa. We’ll explain more about this soon so you can better understand how each one affects people differently.
The two subspecies of marijuana represent different adaptations to different climates. Sativa originates from the jungles of equatorial regions such as Thailand, Cambodia, Jamaica, Colombia, and Mexico, places that enjoy long hours of sunshine and constant light throughout the year. The Indica variety, on the other hand, comes from the Hindu Kush region, a vast mountain range of more than 800 kilometers that stretches from Afghanistan to China and is characterized by a very cold climate.
Climatic and physical characteristics
Cannabis Sativa is known for its ability to adapt to the heat of tropical climates, being resistant to low temperatures and showing an effective ability to prevent the growth of fungi commonly associated with humidity. Indicas, on the other hand, originate from mountainous climates, which enables them to withstand climatic challenges such as wind, rain, and frost.
Morphology and appearance:
Morphology of Cannabis Sativa
Cannabis Sativa plants, are distinguished by their unique morphology and appearance, which tend to be taller and more slender, with long, thin leaves, differentiating them from other marijuana species such as Indica and Ruderalis. The following points highlight the main morphological and appearance characteristics of Sativa:
- Height and Structure: Cannabis sativa plants are typically tall and slender, with some varieties reaching heights of up to 20 feet (about 6 meters) under optimal conditions. They have a more open structure compared to the bushier Cannabis indica, allowing for greater light penetration throughout the plant.
- Leaves: The leaves of Cannabis sativa are characteristically long and narrow with a light green color. They possess serrated edges and are composed of slender leaflets that are spread far apart. The number of leaflets can vary, usually between 5 to 13 per leaf.
- Branching: Sativa plants have less dense branching compared to their indica counterparts, with branches extending outward and upward, giving the plant an airy appearance. This less compact structure is beneficial for air circulation and can help in reducing the risk of mold and fungal diseases in humid environments.
- Flowers (Buds): The flowers of Cannabis sativa are elongated and less dense than those of indica plants. They tend to be more “fluffy” or airy and can appear on the plant as spaced, apart clusters. The flowering period for sativa strains is generally longer, often taking between 10 to 16 weeks to fully mature.
- Trichomes: While both sativa and indica plants produce trichomes (the resinous glands containing cannabinoids), the concentration and distribution can vary. Sativa plants typically have a high concentration of trichomes on the flowers and surrounding foliage, contributing to their potent therapeutic and psychoactive properties.
- Root System: Cannabis sativa plants develop a deep taproot system, which enables them to access water from deeper soil layers. This characteristic is beneficial for plants growing in arid conditions, allowing them to thrive where other plants might not.
- Growth Pattern and Maturation: Sativa strains usually have a longer vegetative growth phase, which contributes to their tall stature. Their extended flowering time requires patience but can result in high yields of marijuana flowers.
Cannabis sativa strains are often associated with a cerebral, uplifting high, attributed to their higher concentration of THC in comparison to CBD. This makes them particularly popular for daytime use. The distinct morphology and appearance of sativa not only contribute to its cultivation requirements but also influence its effects and applications, making it a fav
Morphology of Cannabis Indica
Cannabis Indica plants have distinctive morphological traits, shorter and more compact appearance, with wider and denser leaves, traits that differentiate from Sativa and Ruderalis. The main characteristics of Indica are described below:
- Height and Structure: Cannabis indica plants are generally shorter and bushier than their sativa counterparts, typically reaching heights of 2 to 4 feet (about 0.6 to 1.2 meters). They have a compact, dense structure, which makes them well-suited for indoor cultivation.
- Leaves: The leaves of Cannabis indica are broad and dark green, with fewer but wider leaflets compared to sativa plants. Indica leaves often have between 7 to 9 leaflets, which are closer together, giving the leaf a fuller appearance.
- Branching: Indica plants have dense branching, with closer internodal spaces. This compact growth habit results in a bushy appearance and contributes to their ability to produce more buds in a smaller space.
- Flowers (Buds): The buds of Cannabis indica plants are typically dense, thick, and bulky, clustering around the plant’s nodes. Due to the plant’s compact nature, these buds are often heavier and more resinous than those of sativa strains, leading to higher yields per square foot in controlled environments.
- Trichomes: Cannabis indica plants are known for their abundant trichome production, which covers the buds and surrounding foliage in a thick layer of crystalline resin. This resin is rich in cannabinoids like THC and CBD, making indica strains highly potent.
- Root System: Indica plants have a more spread-out root system compared to the deep taproot of sativa plants. This characteristic makes them more adaptable to various growing mediums and efficient in nutrient uptake from the soil.
- Growth Pattern and Maturation: Cannabis indica strains have a shorter vegetative growth phase and a faster flowering cycle than sativa strains, often maturing in 6 to 8 weeks. This quick turnaround makes them attractive to cultivators looking for a fast crop.
- Effects: Indica strains are traditionally associated with a sedative, body-centric effect, often referred to as a “body high.” This makes them popular for evening use, providing relaxation and aiding in sleep.
The morphology and appearance of Cannabis indica are not just significant for identification; they also have practical implications for cultivation and use. The compact, dense growth of indica plants makes them particularly suited for indoor or space-constrained environments. Their potent, resinous buds are favored for their strong therapeutic effects, offering relief from pain, anxiety, insomnia, and more.
Chemical and Psychoactive Composition
Both subspecies contain a variety of chemical compounds, but the proportions of these compounds can vary.
Cannabis Sativa: Sativas tend to have higher levels of tetrahydrocannabinol (THC), the compound responsible for the psychoactive effects. They may also contain significant amounts of cannabidiol (CBD), which has health properties, but in lower proportions than THC.
Cannabis Indica: Indicas generally have slightly lower THC levels than Sativas, but can still be potent. They tend to have a more balanced ratio of THC and CBD, which can result in a more relaxing and sedative effect.
When it comes to psychoactive effects, it is important to remember that although both Sativa and Indica contain THC, the effects and reactions vary greatly depending on the type of plant.
So which strain is right for me? Amsterdam Marijuana Seeds can tell you:
Sativa is known for its properties that induce a state of euphoria and greater sociability compared to the Indica variety. This sub-species enhances perception, intensifying the appreciation of colors and sounds while stimulating creativity and thinking. Sativa is used to relieve stress, anxiety, depression, nausea, migraines, and as an appetite stimulant, among other wellness benefits.
On the other hand, Indica, known for its relaxing and sedative properties, is highly effective in the treatment of insomnia and a variety of conditions. It is widely used to alleviate neuromuscular disorders such as tremors and, spasms, and to combat chronic pain. It is also a valuable option for reducing anxiety and stress and stimulating appetite in patients who need it.
Alternative uses
Cannabis Sativa: Sativas are often used to treat depression, anxiety and to improve mood. They can also be useful in treating attention deficit disorder and stimulating appetite.
Cannabis Indica: Indicas are preferred for the treatment of chronic pain, insomnia, anxiety and to relax tense muscles. They are also commonly used to treat gastrointestinal disorders.
It is important to note that due to hybridisation and genetic variability of marijuana strains, classification as sativa or indica is not always accurate. In addition, individual experience with these subspecies may vary between individuals and specific strains.
Sativa and Indica are two subspecies with marked differences in morphology, chemical composition, psychoactive effects, and alternative uses. The choice between one or the other depends on the personal preferences and therapeutic needs of each individual.

White House Finally Comments On Marijuana Industry

Stop Using Bat Poop to Fertilize Your Weed Plants Immediately, Here is Why…

The History Behind April Fool’s Day

Star signs and cannabis strains: April 2025 horoscopes

Does Comfort Food Actually Help

Connect to cannabis history with three legacy strains from Paradise Seeds

This State’s Cannabis Revenue Keeps Pouring In

Major Bloom: Cultivating community, creativity, and cannabis in Worcester

How a Colorado operator stumbled onto ‘blueprint for laundering marijuana’

Northern Ireland: Man charged after £425,000 worth of cannabis seized

Distressed Cannabis Business Takeaways – Canna Law Blog™

United States: Alex Malyshev And Melinda Fellner Discuss The Intersection Of Tax And Cannabis In New Video Series – Part VI: Licensing (Video)

What you Need to Know

Drug Testing for Marijuana – The Joint Blog

NCIA Write About Their Equity Scholarship Program

It has been a wild news week – here’s how CBD and weed can help you relax

Cannabis, alcohol firm SNDL loses CA$372.4 million in 2022

A new April 20 cannabis contest includes a $40,000 purse

Your Go-To Source for Cannabis Logos and Designs

UArizona launches online cannabis compliance online course
-
 Cannabis News2 years ago
Distressed Cannabis Business Takeaways – Canna Law Blog™
-
 One-Hit Wonders2 years ago
United States: Alex Malyshev And Melinda Fellner Discuss The Intersection Of Tax And Cannabis In New Video Series – Part VI: Licensing (Video)
-
 Cannabis 1012 years ago
What you Need to Know
-
 drug testing1 year ago
Drug Testing for Marijuana – The Joint Blog
-
 Education2 years ago
NCIA Write About Their Equity Scholarship Program
-
 Cannabis2 years ago
It has been a wild news week – here’s how CBD and weed can help you relax
-
 Marijuana Business Daily2 years ago
Cannabis, alcohol firm SNDL loses CA$372.4 million in 2022
-
 California2 years ago
A new April 20 cannabis contest includes a $40,000 purse