

Cannabis News
Emergency Stoner Snacks – You’re High, Can’t Drive, No DoorDash or Delivery, What Do You Do?


Emergency Stoner Snacks
Picture this: it’s the middle of the night, and you’ve just indulged in a delightful session with your favorite herbal companion. Suddenly, out of nowhere, it hits you like a ton of bricks – the munchies. This insatiable hunger, a well-known side effect of marijuana consumption, can strike at any moment, leaving you with an overwhelming desire to devour everything in sight.
For stoners, the munchies are both a curse and a blessing. On one hand, food simply tastes better when you’re high. Flavors are enhanced, textures are more satisfying, and even the most mundane snacks can feel like a gourmet feast. It’s a sensory experience that elevates the joy of eating to new heights. On the other hand, when the munchies hit hard, they can create some challenges.
You see, when you’re deep in the throes of a munchies attack, decision-making skills aren’t exactly at their peak. Stoners often find themselves staring blankly into the fridge or pantry, overwhelmed by the endless possibilities and unable to choose what to eat. The struggle is real, folks. Do you go for something sweet or savory? Crunchy or chewy? The options are limitless, and the indecision can be paralyzing.
But fear not, my fellow stoners, for we have a solution to your munchies woes. In this article, we’ll be sharing some emergency stoner snacks that are quick, easy, and satisfying. These recipes are designed for those moments when you need something to munch on ASAP, without requiring too much brain power or culinary skill.
So Sit back, roll yourself one, and let’s get into it.
The Sleezy Jeff: The Sloppy Joe’s Lesser-Known Cousin
Ladies and gentlemen, allow me to introduce you to the Sleezy Jeff – the not-so-popular cousin of the beloved Sloppy Joe. While the Sloppy Joe is a classic, the Sleezy Jeff is the unsung hero of the stoner snack world. It’s the go-to choice when you’re high, hungry, and in need of something quick and satisfying.
At its core, the Sleezy Jeff is a simple creation. It consists of two slices of bread, some cold cuts, a slice or two of cheese, and a quick trip to the microwave for 30 seconds. That’s it. No frills, no fuss, just pure, unadulterated munchies satisfaction. It’s the Sleezy Jeff in its rawest, most basic form.
But here’s where things get interesting. The beauty of the Sleezy Jeff lies in its versatility. Depending on what you have lurking in your fridge, you can elevate this humble snack to new heights. Enter the Sleezy Jeff Supreme – a glorious upgrade that will make your taste buds sing.
To create a Sleezy Jeff Supreme, start by spreading some cream cheese on your bread. Then, layer on some ham and top it off with a slice of yellow cheese. Pop it in the microwave for that signature Sleezy Jeff warmth, and then let your creativity run wild. Got some avocado? Slice it up and add it on top. Tomato? Why not? The more, the merrier.
Now, some might argue that the Sleezy Jeff is just a fancy name for a sandwich. But oh, how wrong they would be. The Sleezy Jeff is the Frankenstein’s monster of the sandwich world. It’s a beautiful amalgamation of whatever your heart desires and whatever your fridge has to offer. There are no rules, no limitations – just pure, unbridled culinary experimentation.
So the next time the munchies strike and you find yourself in need of a quick fix, remember the Sleezy Jeff. It may not be the prettiest snack on the block, but it’s a faithful friend that will never let you down. Embrace the chaos, let your creativity flow, and savor every messy, delicious bite of this stoner staple.
Long live the Sleezy Jeff!
Next up on our list of emergency stoner snacks for the magic munchies are the Taquitos Supreme. These delightful little rolled-up tortillas filled with savory goodness can be found in the frozen food section of any grocery store. They’re a staple in many a stoner’s freezer, and for good reason.
Now, some people might be content with simply popping these taquitos in the microwave and calling it a day. But let’s be real – that’s not how a true stoner rolls (pun intended). To create the ultimate Taquitos Supreme, we’re going to take things to the next level.
First, grab your desired number of taquitos and heat up some oil in a pan. Once the oil is hot, place the taquitos in the pan and let them brown and crisp up on all sides. Here’s a pro tip: have a lid ready to cover the pan and steam the taquitos simultaneously. This little trick will ensure that they’re crispy on the outside and perfectly heated on the inside. Give them about 5-10 minutes to reach golden perfection.
Next, it’s time to add some flavor. Grab some soy sauce or any other sauce that tickles your fancy and would pair well with these taquitos. Gently drizzle the sauce over the top of the taquitos, making sure each one gets a nice coating.
Now, here comes the best part – the cheese. Sprinkle a generous amount of shredded cheese over the top of the taquitos. You can use whatever cheese you have on hand, but we recommend something that melts nicely, like cheddar or monterey jack. Pop the whole pan into the microwave for about 30 seconds, or until the cheese is melted and bubbly.
Finally, grab some additional sauce for dipping (because let’s face it, you can never have too much sauce), find a cozy spot, and prepare to indulge in your Taquitos Supreme creation. The combination of crispy tortillas, savory filling, melted cheese, and flavorful sauce is sure to satisfy even the most intense munchies.
The best part? This entire process takes only about 12 minutes from start to finish. It’s a quick and easy way to quench the munchie monster without resorting to anything too unhealthy. Sure, it’s not exactly a superfood, but compared to some other late-night snack options, the Taquitos Supreme is practically a gourmet meal. Plus, it tastes absolutely delicious, and isn’t that what really matters when you’re high and hungry?
So the next time you find yourself with a freezer full of taquitos and a serious case of the munchies, remember the Taquitos Supreme. Your taste buds (and your stoner soul) will thank you.
Attention all stoners with a sweet tooth! Allow me to introduce you to the Peanut Butter Snack Witch – a delightful creation that will satisfy your cravings and leave you craving more. Now, technically, this recipe calls for a snackwich maker, one of those nifty devices that press bread together and toast it to perfection. But fear not, my resourceful friends, a waffle maker or any other type of press will work just as well.
If you don’t have any of these devices on hand, don’t worry. You can still join in on the Snack Witch fun. Simply start by toasting your bread on both sides until it reaches your desired level of crispiness. This extra step will ensure that your Snack Witch has a sturdy foundation to build upon.
Now, here’s where the magic happens. Take one slice of your toasted bread and spread a generous amount of peanut butter on it. On the other slice, slather on some jelly – whatever flavor your heart desires. Strawberry, grape, raspberry, the possibilities are endless. Once your bread is sufficiently coated in this heavenly combination, pop it into your snackwich maker or press and let it work its magic.
As your Snack Witch cooks, the aroma of warm peanut butter and sweet jelly will fill the air, making your mouth water in anticipation. After a few moments of delicious torture, your creation will be ready. Carefully remove it from the maker and behold the glory of the Peanut Butter Snack Witch.
Take a moment to admire its golden-brown exterior, the way the peanut butter and jelly ooze out ever so slightly from the edges. Then, sink your teeth into this sweet and savory masterpiece. The combination of crispy bread, creamy peanut butter, and fruity jelly is nothing short of addictive. Don’t be surprised if you find yourself going back for seconds, thirds, or even fourths. It’s just that good.
But wait, there’s more! The beauty of the Peanut Butter Snack Witch lies in its versatility. Once you’ve mastered the basic recipe, it’s time to get creative. Try adding a layer of Nutella for an extra dose of chocolatey goodness. Sprinkle in some chocolate bits for a delightful crunch. If you’re feeling particularly indulgent, add a few marshmallows or a smear of cream cheese. The possibilities are endless, and the only limit is your imagination (and perhaps the contents of your pantry).
So the next time the munchies strike and your sweet tooth is calling, remember the Peanut Butter Snack Witch. It’s a quick, easy, and insanely delicious way to satisfy your cravings. Just be warned – once you’ve had a taste of this magical munchie treat, there’s no going back. Your taste buds will be forever enchanted by the Snack Witch’s spell.
If you’re hungry and need a snack idea…I think these would make insanely good munchies. We have to be resourceful when we’re “in the thick of it”. If you enjoyed these and perhaps want to know some healthier alternatives, let me know in the comments and I may write about it in the future.
Until then, happy snacking!
SUPER STONER SNACK IDEAS, READ ON…

Cannabis News
Why You Shouldn’t Vote for Kamala Harris Just Because of Her Position on Cannabis- Banana in the Tailpipe, Again?


Why you shouldn’t base your vote on Harris’ Cannabis Stance
As a long-time observer of the political circus, I’ve seen my fair share of grand promises and lackluster deliveries. It’s an age-old dance: politicians, with their eyes on the prize, will say just about anything to secure your vote. They’ll promise the moon, the stars, and a side of universal healthcare, only to serve up a watered-down version of their campaign pledges once in office. It’s not necessarily malicious; it’s just the nature of the beast we call politics.
Now, with Biden stepping aside and rumors swirling about his health, all eyes are on Kamala Harris as the potential next Democratic presidential candidate. I’ve been hearing a lot of chatter, especially in cannabis circles, about throwing support behind Harris if she promises to legalize weed. And I get it, I really do. Cannabis reform is a critical issue for many of us.
But here’s where I need to pump the brakes and offer a word of caution: basing your vote on a single issue, especially one as prone to political flip-flopping as cannabis legalization, is a risky game. Remember the Biden-Harris ticket’s promises of criminal justice reform? How many people actually walked free from cannabis possession charges? The answer might disappoint you.
Before you pin all your hopes on Harris’s cannabis stance, let’s take a closer look at her history with the issue and why political promises, especially when it comes to weed, should be taken with a hefty dose of skepticism. After all, in the world of politics, today’s firm stance could be tomorrow’s convenient pivot.
As we dive deep into Kamala Harris’s political career, it’s a tale of evolving stances and convenient shifts that mirror the changing tides of public opinion on cannabis. Let’s start at the beginning, shall we?
During her tenure as California’s Attorney General from 2011 to 2017, Harris oversaw the conviction of nearly 2,000 people on marijuana-related charges. That’s right, the same woman now championing cannabis reform was once responsible for putting people behind bars for the very thing she now supports legalizing. It’s a stark reminder of how quickly political winds can change – or how quickly politicians can change with them.
Fast forward to the 2020 Democratic primaries, and we see a different Harris. Despite her initial buzz as a top contender, her campaign fizzled out faster than a poorly rolled joint. She dropped out before the Iowa caucuses, trailing far behind other candidates. It was a humbling experience that likely prompted some serious strategizing about her political future.
Then came the VP selection. Suddenly, Harris found herself on a ticket with Joe Biden, a man who had built much of his early career on being tough on drugs. It’s worth noting that Biden, too, has done some impressive political gymnastics on this issue. From being a key architect of punitive drug laws to now pardoning federal marijuana possession convictions, Biden’s evolution mirrors Harris’s own pivot.
As a Senator, Harris did introduce pro-cannabis legislation. The Marijuana Opportunity Reinvestment and Expungement (MORE) Act was a step in the right direction, aiming to decriminalize marijuana at the federal level. But let’s be real – introducing a bill is a far cry from getting it passed, especially when you’re no longer in the legislative branch.
Recently, Harris has been vocal about cannabis reform. She’s called for speeding up the reclassification of marijuana and has stated that “nobody should have to go to jail for smoking weed.” It’s a far cry from her days as AG, isn’t it?
But here’s where the rubber meets the road – or should I say, where the joint meets the lips. Despite all the big talk from the Biden-Harris administration about reform, what we’ve actually seen is disappointingly little. In four years, with a Democratic majority, they’ve failed to pass any significant cannabis legislation. Instead, we’re left with a proposal to reschedule cannabis to Schedule III – a move that feels more like a bone thrown to Big Pharma than true reform for the people.
And now, with the rescinding of the Chevron Doctrine, even this watered-down attempt at reform is likely to be tied up in legal battles for years. It’s a bureaucratic nightmare that does little to address the real issues faced by cannabis users and those imprisoned for marijuana offenses.
Here’s the kicker – this isn’t even the reform that most cannabis advocates want. We’re not looking for a slight shuffling of bureaucratic categories. We want full descheduling. We want cannabis treated like the plant it is, not a controlled substance. Anything short of that is just maintaining the status quo with a slightly friendlier face.
So, when we look at Harris’s cannabis stance, let’s not forget this context. It’s a stance that has conveniently evolved with public opinion, but still falls short of meaningful change. It’s a reminder that in politics, what’s promised on the campaign trail often bears little resemblance to what’s delivered in office.
As someone who’s been around the political block a few times, I’ve seen far too many people fall into the trap of single-issue voting. It’s understandable – we all have causes close to our hearts, issues that ignite our passions. For some, it’s cannabis legalization; for others, it might be gun rights or abortion. But here’s the hard truth: voting based on a single issue is like buying a car solely because you like its color.
Politicians, my friends, don’t exist in a vacuum. They’re part of a larger system, a complex web of party politics, special interests, and power dynamics. When you vote for a candidate based on their stance on cannabis, you’re not just getting their weed policy – you’re getting the whole package. And let me tell you, that package often includes a lot of things you might not be so keen on.
Take a step back and look at the bigger picture. Both major parties, despite their apparent differences, often align on issues that directly impact our daily lives. They’re both pro-war, pro-big pharma, pro-big banks. They might squabble over social issues, but when it comes to the core economic and foreign policies that shape our world, they’re often two sides of the same coin.
This is why we desperately need more diversity in our political system. The two-party structure is a relic that’s long outlived its usefulness. It pits American against American, reducing complex issues to simplistic “us vs. them” narratives. It’s a system that thrives on division, not unity.
But here’s where I really want you to pay attention: if you want to see real change, start local. National elections might get all the glitz and glamour, but the nitty-gritty work of democracy happens in your town halls, your city councils, your state legislatures. That’s where policies that directly affect your daily life are hammered out. Want to see cannabis reform? Start by engaging with your local government.
The folks in Washington? They’re in a different world. They’re surrounded by lobbyists, insulated from the day-to-day struggles of average Americans. They’re more likely to hear the concerns of a pharmaceutical CEO than those of a small-time cannabis grower or a patient seeking alternative medicine.
So here’s my advice: break free from party loyalty. Look at the facts, examine the principles behind the policies. Most importantly, judge politicians not just by their words, but by their actions. How often do they follow through on their promises? How consistent are they in their principles?
Critical thinking is key here. Don’t just swallow what the media or the politicians are feeding you. Question everything. Analyze. Compare. And remember, your vote is precious – it’s your voice in this democracy. Don’t give it away based on a single issue or a catchy slogan.
In the end, politics is about the big picture. It’s about the kind of society we want to live in, the values we want to uphold. So the next time you’re in that voting booth, think beyond the single issue. Look at the whole cake, not just the cherry on top. Your future – our future – depends on it.
KAMALA ON CANNABIS REFORM, READ ON…

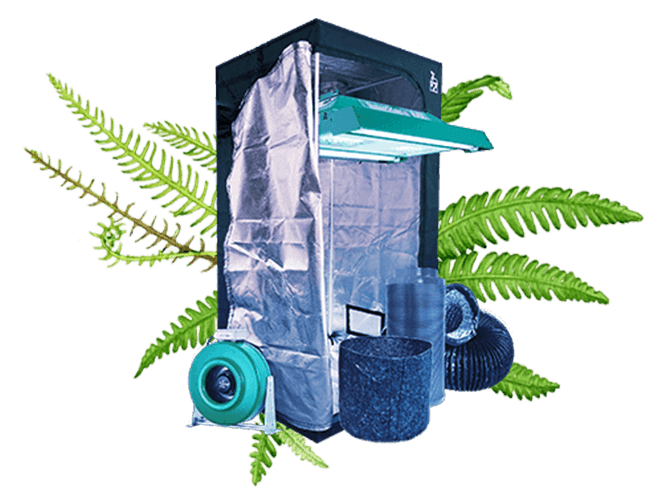
Cannabis cultivation at home has gained immense popularity, particularly with the legalization of recreational and medical marijuana in many regions, so reading A Beginner’s Guide to Setting Up a Cannabis Grow Tent will be helpful.
A grow tent is an ideal solution for those looking to create a controlled environment for their cannabis plants. This beginner’s guide to setting up a cannabis grow tent will walk you through the essential steps and considerations to ensure a successful and fruitful grow.

Why Choose a Grow Tent?
A grow tent offers numerous advantages, including:
- Controlled Environment: Grow tents allow you to control light, temperature, humidity, and airflow, creating optimal conditions for your plants.
- Pest and Odor Management: The enclosed space helps keep pests out and contains odors, making indoor cultivation more manageable.
- Discreet and Space-Efficient: Grow tents come in various sizes, fitting easily into small apartments or spare rooms.
Essential Components for Your Grow Tent
Before setting up your grow tent, it’s crucial to gather all the necessary components:
- Grow Tent: Choose a tent size that fits your space and growing needs. Common sizes include 2×2, 3×3, and 4×4 feet.
- Grow Lights: LED, HID (High-Intensity Discharge), and CFL (Compact Fluorescent Lights) are popular choices. LED lights are energy-efficient and produce less heat.
- Ventilation System: Includes inline fans, ducting, and carbon filters to ensure proper airflow and odor control.
- Grow Medium: Soil, coco coir, or hydroponic systems. Each medium has its pros and cons.
- Nutrients: Essential for plant growth. Choose a nutrient line designed for cannabis.
- Pots or Containers: Fabric pots are popular for their breathability and drainage.
- Thermometer and Hygrometer: To monitor temperature and humidity levels.
- Timers: To automate light schedules.
- pH and EC Meters: To test water and nutrient solution quality.
Step-by-Step Guide to Setting Up Your Grow Tent
1. Choose the Right Location
Select a location that is discreet, has access to electricity, and can handle occasional spills or water leaks. Ensure the area has enough space to accommodate your tent and allow for easy access.
2. Assemble Your Grow Tent
Follow the manufacturer’s instructions to assemble your grow tent. Ensure all zippers, seams, and poles are securely in place. Check for light leaks, as even small leaks can disrupt your plants’ light cycle.
3. Install the Grow Lights
Mount your grow lights at the appropriate height above the canopy. LED lights typically need to be 18-24 inches above the plants, while HID lights require more distance due to their higher heat output. Connect your lights to a timer to automate the light cycle, providing 18 hours of light and 6 hours of darkness during the vegetative stage, and 12 hours of light and 12 hours of darkness during the flowering stage.
4. Set Up the Ventilation System
Proper ventilation is crucial for maintaining temperature, humidity, and CO2 levels. Install an inline fan and ducting to exhaust hot air from the tent. Position the fan near the top of the tent where heat accumulates. Connect the ducting to a carbon filter to eliminate odors. Consider adding an oscillating fan inside the tent to promote air circulation and strengthen plant stems.
5. Prepare the Growing Medium
Fill your pots or containers with the chosen growing medium. If using soil, opt for a high-quality, well-draining mix. For coco coir or hydroponic systems, ensure the medium is pre-soaked and buffered as needed. Place your containers inside the grow tent, leaving enough space between them for air circulation and growth.
6. Plant Your Cannabis Seeds
Germinate your cannabis seeds using your preferred method, such as the paper towel method or directly planting them in the growing medium. Once germinated, plant the seeds in your prepared pots, covering them lightly with soil or medium.

7. Water and Feed Your Plants
Water your plants with pH-balanced water (6.0-7.0 for soil, 5.5-6.5 for coco coir and hydroponics). Start with small amounts and gradually increase as the plants grow. Introduce nutrients according to the manufacturer’s guidelines, starting with a quarter to half strength for young plants and increasing as they mature. Monitor the plants for signs of nutrient deficiencies or excesses.
8. Monitor Temperature and Humidity
Maintain optimal temperature (70-85°F) and humidity levels (40-70%) using a thermometer and hygrometer. Adjust the ventilation system and use humidifiers or dehumidifiers as needed to keep conditions within the ideal range.
9. Train and Prune Your Plants
Training techniques like topping, low-stress training (LST), and the Screen of Green (ScrOG) method can maximize light exposure and promote even canopy growth. Prune lower leaves and branches to improve airflow and focus energy on bud development.
10. Monitor and Adjust Light Height
As your plants grow, adjust the height of your grow lights to prevent light burn and ensure even coverage. Follow the manufacturer’s recommendations for light distance and intensity.
11. Monitor pH and EC Levels
Regularly test the pH and electrical conductivity (EC) of your water and nutrient solution to ensure they are within the optimal range. Adjust as needed to prevent nutrient lockout and deficiencies.
12. Harvest Your Cannabis Plants
When the plants reach maturity, typically 8-12 weeks into the flowering stage, it’s time to harvest. Look for signs of readiness, such as the color of the pistils and trichomes. Cut the plants at the base and hang them upside down in a dark, well-ventilated area to dry. After drying, trim the buds and cure them in airtight containers to enhance flavor and potency.
Tips for a Successful Grow Tent Experience
- Start Small: Begin with a small tent and a few plants to learn the basics before scaling up.
- Keep a Grow Journal: Document your grow, noting dates, feeding schedules, and observations to help you learn and improve.
- Research and Learn: Continuously educate yourself about cannabis cultivation techniques and stay updated with the latest trends and technologies.
- Be Patient: Growing cannabis requires time and attention. Be patient and consistent in your care routine.
- Join Online Communities: Engage with other growers on forums and social media platforms to share experiences and seek advice.
Common Mistakes to Avoid
- Overwatering: Allow the growing medium to dry out slightly between watering to prevent root rot.
- Incorrect pH Levels: Regularly test and adjust pH to ensure nutrient availability.
- Light Leaks: Seal any light leaks to maintain the correct light cycle for your plants.
- Overfeeding: Start with lower nutrient concentrations and increase gradually to avoid nutrient burn.
- Poor Ventilation: Ensure adequate airflow to prevent mold and mildew growth.
Conclusion
Setting up a cannabis grow tent can be a rewarding and enjoyable experience for beginners. By following this guide and paying close attention to the needs of your plants, you can create a thriving indoor garden and enjoy the fruits of your labor. Remember to start small, stay informed, and be patient as you develop your skills as a cannabis cultivator. Happy growing!
Cannabis News
Nutrient Management for Indoor Cannabis Plants Tips and Tricks » How to Grow Weed Indoors
Growing cannabis indoors has become increasingly popular due to the control it offers over the growing environment, thus Nutrient Management for Indoor Cannabis Plants is important.
One of the most critical aspects of successful indoor cannabis cultivation is proper nutrient management. Understanding the right nutrients and their application can significantly impact the health and yield of your plants. This article provides comprehensive tips and tricks for effective nutrient management for indoor cannabis plants.

Understanding Cannabis Nutrients
Cannabis plants require a variety of nutrients to thrive, which are typically categorized into macronutrients and micronutrients.
Macronutrients
- Nitrogen (N): Essential for vegetative growth, nitrogen plays a vital role in photosynthesis and the development of plant tissues.
- Phosphorus (P): Crucial during the flowering stage, phosphorus supports root development and energy transfer within the plant.
- Potassium (K): Potassium aids in water uptake, enzyme activation, and overall plant health, enhancing the plant’s resistance to diseases.
Micronutrients
- Calcium (Ca): Important for cell wall structure and growth.
- Magnesium (Mg): Central to chlorophyll production and photosynthesis.
- Sulfur (S): Vital for amino acid production and enzyme function.
- Iron (Fe), Manganese (Mn), Zinc (Zn), Copper (Cu), Boron (B), Molybdenum (Mo), and Chlorine (Cl): These trace elements are required in smaller quantities but are essential for various biochemical processes.
Choosing the Right Nutrients
Organic vs. Synthetic Nutrients
- Organic Nutrients: Derived from natural sources, organic nutrients improve soil health and promote beneficial microbial activity. They release nutrients slowly, reducing the risk of nutrient burn.
- Synthetic Nutrients: These are chemically formulated to provide immediate nutrient availability. They are highly concentrated and can be precisely measured and adjusted.
Nutrient Ratios
During different growth stages, cannabis plants require varying nutrient ratios:
- Vegetative Stage: Higher nitrogen levels to support leaf and stem growth. A typical N-P-K (Nitrogen-Phosphorus-Potassium) ratio for this stage might be 3-1-2.
- Flowering Stage: Increased phosphorus and potassium to support bud development. An ideal N-P-K ratio might be 1-3-2.
Tips for Effective Nutrient Management
1. Start with a Quality Growing Medium
The growing medium significantly impacts nutrient availability. Common choices include soil, coco coir, and hydroponics:
- Soil: Rich in organic matter, soil can retain nutrients and provide a buffering effect.
- Coco Coir: Offers good aeration and water retention, but requires additional calcium and magnesium.
- Hydroponics: Provides direct access to nutrients in water, allowing precise control but requiring diligent monitoring.
2. pH Management
Maintaining the correct pH level is crucial for nutrient uptake. For soil, aim for a pH of 6.0-7.0, while hydroponics and coco coir should be between 5.5-6.5. Use pH meters or test kits to regularly check and adjust the pH.
3. Gradual Nutrient Introduction
Introduce nutrients gradually, especially for seedlings and young plants. Start with a quarter to half of the recommended dose and gradually increase as the plants mature.
4. Monitor for Nutrient Deficiencies and Toxicities
Regularly inspect your plants for signs of nutrient deficiencies (yellowing leaves, stunted growth) and toxicities (leaf burn, nutrient lockout). Early detection allows for timely adjustments.
5. Use a Feeding Schedule
Establish a consistent feeding schedule based on the plant’s growth stage. Many growers use a weekly schedule, alternating between feeding and watering.
6. Flush the Plants
Flushing involves running plain water through the growing medium to remove excess salts and nutrient buildup. This is particularly important before the harvest to improve the taste and quality of the buds.
7. Supplement with Beneficial Microbes
Inoculating the growing medium with beneficial microbes can enhance nutrient availability and promote plant health. Products containing mycorrhizal fungi and beneficial bacteria can be highly effective.
Advanced Tips for Optimizing Nutrient Management
1. Tailor Nutrients to Specific Strains
Different cannabis strains may have varying nutrient requirements. Researching the specific needs of your chosen strain can help optimize growth and yield.
2. Employ Foliar Feeding
Foliar feeding involves spraying a nutrient solution directly onto the leaves. This can provide a quick nutrient boost and correct deficiencies rapidly. However, it should complement, not replace, root feeding.
3. Utilize Automated Feeding Systems
Automated feeding systems can ensure consistent nutrient delivery, particularly in hydroponic setups. These systems can be programmed to provide precise amounts of nutrients at scheduled intervals.
4. Integrate CO2 Enrichment
Enriching the grow room with CO2 can enhance photosynthesis and nutrient uptake, leading to faster growth and higher yields. Ensure proper ventilation and monitor CO2 levels to avoid overexposure.
5. Experiment with Additives
Various additives, such as amino acids, enzymes, and vitamins, can boost plant health and productivity. Experimenting with different products can help identify what works best for your setup.
Troubleshooting Common Nutrient Issues
1. Nutrient Burn
- Symptoms: Leaf tips turning brown and crispy.
- Solution: Reduce nutrient strength and flush the growing medium with plain water.
2. Nutrient Lockout
- Symptoms: Yellowing leaves despite adequate feeding.
- Solution: Check and adjust pH levels, and flush the medium to remove salt buildup.
3. Nutrient Deficiencies
- Nitrogen Deficiency: Yellowing lower leaves.
- Phosphorus Deficiency: Dark, discolored leaves with purple stems.
- Potassium Deficiency: Yellowing edges and brown spots on leaves.
Regularly monitoring and adjusting your nutrient regimen can prevent these issues from escalating.
Conclusion
Effective nutrient management is essential for the successful cultivation of indoor cannabis plants. By understanding the specific needs of your plants and tailoring your nutrient regimen accordingly, you can maximize growth and yield. Remember to maintain the right pH levels, introduce nutrients gradually, and monitor your plants closely for signs of deficiencies and toxicities. Employing advanced techniques such as foliar feeding, automated systems, and CO2 enrichment can further optimize your results. With careful attention and a proactive approach, you can ensure your indoor cannabis plants thrive, producing high-quality, potent buds.

Pot prohibition costs Florida at least $200 million per year

Union’s initiative to organize Oregon marijuana workers nears ballot

Cannabis and Mental Health: Recent Research and Implications

Why You Shouldn’t Vote for Kamala Harris Just Because of Her Position on Cannabis- Banana in the Tailpipe, Again?

Your Trusted Amsterdam Seed Bank – Powered by Mother Nature, Breeding since 1996

Sam Hilliard’s clutch homer, Ezequiel Tovar’s walk-off send Rockies to win over Red Sox in 12 innings

Keeler: Trevor Story returned to Denver, but it was Rockies fan, transplant survivor who rocked Coors Field

As Trevor Story returns to Coors Field for first time since signing with Red Sox, injury-riddled shortstop remains confident he can regain old form

More RTD "slow zones" added as summer repairs move forward

Canadian wildfire smoke triggers poor air quality, health advisories in Colorado

Distressed Cannabis Business Takeaways – Canna Law Blog™

United States: Alex Malyshev And Melinda Fellner Discuss The Intersection Of Tax And Cannabis In New Video Series – Part VI: Licensing (Video)

What you Need to Know

Drug Testing for Marijuana – The Joint Blog

Cannabis, alcohol firm SNDL loses CA$372.4 million in 2022

NCIA Write About Their Equity Scholarship Program

It has been a wild news week – here’s how CBD and weed can help you relax

City Of Oakland Issues RFP For Employee Training Programs

A new April 20 cannabis contest includes a $40,000 purse

Your Go-To Source for Cannabis Logos and Designs
-
 Cannabis News1 year ago
Distressed Cannabis Business Takeaways – Canna Law Blog™
-
 One-Hit Wonders1 year ago
United States: Alex Malyshev And Melinda Fellner Discuss The Intersection Of Tax And Cannabis In New Video Series – Part VI: Licensing (Video)
-
 Cannabis 1011 year ago
What you Need to Know
-
 drug testing7 months ago
Drug Testing for Marijuana – The Joint Blog
-
 Marijuana Business Daily1 year ago
Cannabis, alcohol firm SNDL loses CA$372.4 million in 2022
-
 Education1 year ago
NCIA Write About Their Equity Scholarship Program
-
 Cannabis1 year ago
It has been a wild news week – here’s how CBD and weed can help you relax
-
 Education1 year ago
City Of Oakland Issues RFP For Employee Training Programs