

Grow Stages
How to Check Trichome Ripeness: Recognize When They’re Ready
Once your cannabis plants have reached maturity in the late flowering stages, they’ll look and smell beautiful. This is often when cultivators start to think about harvesting. Resist the temptation to harvest early and let your plants mature to get the best quality out of your grow.
While it can be difficult to know when to harvest and a bit of an art at times, the most common way is to look at the trichomes on the plant. They can help you to find the ideal “ripeness” for harvest. Under ripe is never ideal, but some growers like a harvest with over ripe trichomes for a more sedative effect.
What are trichomes, and why do they matter?
Trichomes are the terpene and cannabinoid-rich magic in cannabis. They contain the resin and cannabinoids that give cannabis its psychological and medicinal properties. They’re not unique to cannabis – you’ll find them on other plants, lichens, and algae.

The trichomes are also the part of the plant used to create concentrates. They resemble tiny hairs and can be seen without magnification on well-grown mature cannabis. Magnification at 40x or more will reveal a forest of trichomes that coats the flower. Biologically these trichomes are made to protect the plant from pests, predators, and weather. They help the plants stay healthy and strong through flowering and just so happen to smell delicious to humans.
The three types of trichomes

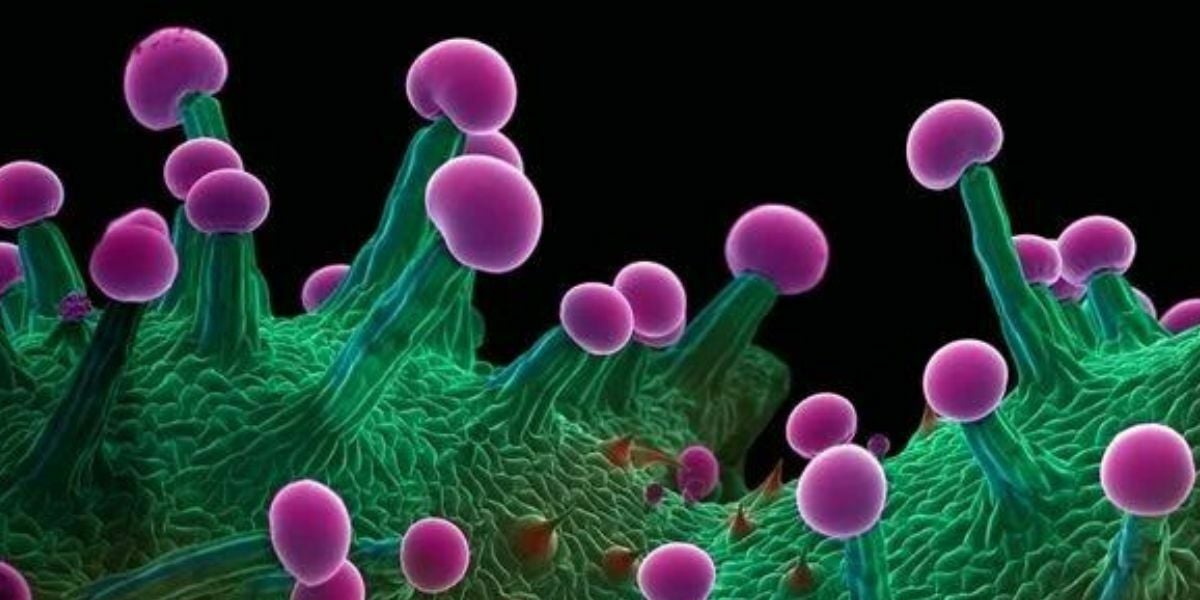
Capitate-stalked Trichomes are hair-like structures with caps full of cannabinoids and terpenes. They are the most abundant trichomes and the most prevalent during the late stages of flowering. While all trichomes contain the chemicals that contribute to the effect of cannabis, stalked trichomes are the main source of chemicals like cannabinoids and terpenes. Capitate-stalked trichomes are easily visible on cannabis flowers, even more so with a magnification of 40x and greater. Use these as an indicator of trichome ripeness.
Capitate-sessile trichomes are found on the sugar leaf and inner buds. They are not visible without magnification and tend to coat the stalks of the plants. Capitate-sessile trichomes grow very close to the plant’s surface and contain both cannabinoids and terpenes. You will not typically use these trichomes to determine ripe buds vs. unripe buds.
Bulbous Trichomes are smaller still than sessile ones and are found on the stems and leaves more than the flower. These are not often used to identify over ripe trichomes as they are the smallest of the three here. However, they will undergo color changes that are noticeable with magnification.
Grow high quality marijuana strains with my step by step guide. Download FREE marijuana grow bible now.
The three stages of trichome ripeness

Clear coloring indicates immature trichomes and a plant that is not ready to harvest. They appear clear because they are still empty. They fill themselves with those juicy chemicals we love as they mature. Harvesting at this point would lead to lower-quality cannabis with less effect, flavor, and aroma.
Milky trichomes begin to look cloudy and white. These are now full of cannabinoids and terpenes. Once trichomes have turned this milky color, the time to harvest is just around the corner, typically within ten days.
Amber trichomes are the finishing line for growers. As the plant’s flowering stage reaches its conclusion, the cells creating resin in the trichomes begin to die and give the trichomes an amber-red/brown shade. The amount of amber trichomes on a cannabis plant is how many growers discuss and decide when to harvest. When trichomes begin to turn amber, the plant is very close to its peak maturity. Soon after, it will degrade and lose potency.
How to check trichome ripeness with a hand-held loupe in three steps
Step one:
Carefully take a look at the trichomes on the plant in its last 2-3 weeks of flower. This can be done with a 40x or greater jeweler’s loupe. Do this regularly to determine your trichomes’ ripeness.

Step two:
Assess the majority color of the trichomes – are they clear – immature, milky – maturing, or amber – mature? If the answer is clear, you’ve got several weeks to go. If they are starting to turn milky, you have about two weeks. If you see any amber, proceed to step three.

Step three:
If amber trichomes start appearing, then assess the percentage. When looking at the flower in general, look at the percentage of trichomes that have gone amber. The general number to shoot for is ~15% amber trichomes. This can be more of an art than science, but shooting for about ~15% amber will reduce the chances of over ripe trichomes.
This percentage of amber trichomes will get the plant right at its most ripe and potent stages. There’s some art in this decision and some grower’s preference. Sativas can be pulled a little earlier (like ~10% amber) to maintain the sativa effects, while some indicas can be pulled later to create an added sedative effect.

Other methods of determining harvest ripeness
It’s worth pointing out that other indicators combined with the trichome coloring technique can help you tell when harvest timing is right. One example is checking the pistils (reproductive organs of the female plant) and stigmas for color. The stigmas are also hair-like in structure but are easily visible in and around the cannabis flower. The stigmas grow from the flower’s bract and are biologically meant to catch pollen.
The stigmas that grow from them start white but gradually degrade to orange or red depending on the cultivar. Curious how to recognize immature or (over) ripe trichomes in combination with looking at the pistils and stigmas? Read this article on when to harvest marijuana for more information.

Personally, I pull plants to harvest when they are a little over 10% amber. I believe harvesting based on the percentage of amber trichomes allows you to get the most potent and lovely-smelling cannabis, with ~15% amber being the ideal time. However, you should start looking at the trichomes regularly once harvest is near to determine the best time to pull your plants using a small jeweler’s loupe or other magnification. Your environment, preferences, and cultivar selection impact this decision as well. Remember that deciding when to harvest isn’t the only key to quality. It’s very important to start with high-quality seeds to get hearty plants and great yields. You can find the best seeds at ILGM.com.
Frequently asked questions about trichome ripeness
How long does it take trichomes to turn amber?
When trichomes start changing from clear to milky in late flower, they’ll be amber in 10-14 days, depending on the plant and environment.
What should trichomes look like before flushing?
Start your flush when milky trichomes first appear to allow for 10-14 days of flush before things start going amber.
Can you see trichomes without a magnifying glass?
You can see trichomes without magnification with good eyesight and the right light. You may not be able to see enough detail to get an accurate perspective on trichome ripeness however.
How do you check trichomes with a phone?
If you don’t have a loupe or other means of magnification, you can use your phone to zoom in and capture an image of the trichomes on the plant. Make sure to keep your hand steady or use a tripod, as the zoom function is excellent but can require some extra time to focus.
Growing cannabis for seed is a passion project undertaken by plant-loving breeders of every caliber. Generation after generation, parent plants are selected and tracked, genetics are improved and stabilized through traditional farming methods, and the resulting traits are documented and enjoyed by growers and consumers. On the other hand, some folks grow seeds accidentally when stray pollen from a rogue plant enters the garden. Which seeds are good?
When talking about recognizing quality weed seeds, there are two main considerations:
- Quality of the future cannabis plant (genetic contents)
- Quality of the seed in terms of its characteristics “as a seed” (i.e., suitability for growing)
This article will assume you are already familiar with the genetic characteristics of the plant you’re planning to grow. It instead examines how to recognize high-quality weed seeds in a batch that you harvested, received as a gift, found in a bud, or bought from a reputable cannabis seed bank.
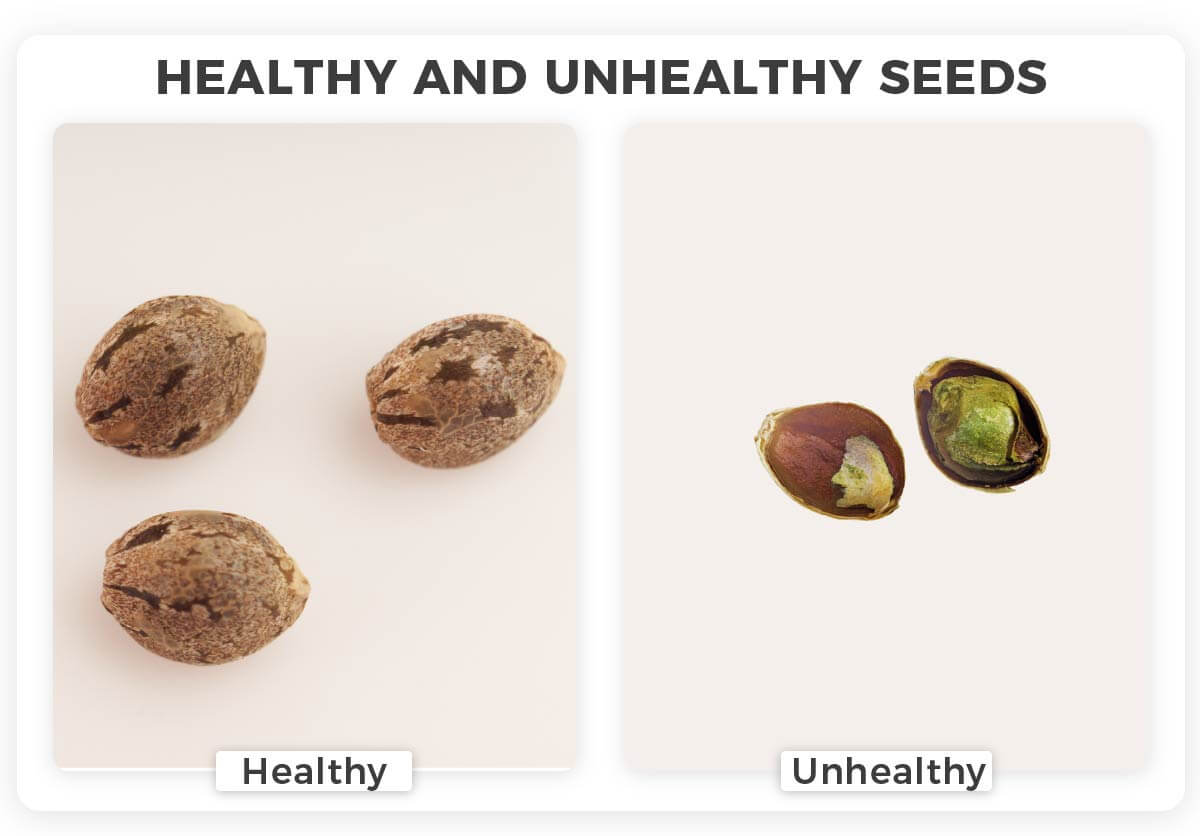
What do healthy cannabis seeds look like?
Healthy cannabis seeds are robust, oval-shaped, shiny, dark-colored, firm, and fully formed when harvested. By contrast, immature and unhealthy seeds appear stunted or shrunken on the non-pointy end (the “abscission” area, i.e., the base where the seed was attached to the flower) and may be light green or white.

Cannabis seed identification myths
Almost all cannabis seeds available to consumers today are incredibly similar in appearance. This is due to how closely related the extreme majority of popular and commercially viable cannabis cultivars (strains, as we incorrectly call them) are compared to their wild and landrace ancestors.
In the 20th century, folks who wanted to grow and breed high-yielding, THC-rich, and fast-finishing (including autoflowering) cannabis under prohibition had a limited selection from which to identify and refine genetics.
For this reason, many easy-to-grow cannabis types share a lot of DNA. Sometimes nicknamed “OG” or “Old School,” stabilized family lines were (and continue to be) used by contemporary cultivators to experiment with hybrid forms that can improve or present unique spins on existing favorites.
Some people believe you can tell what you have just by looking at a seed. In fact, historically, folks have shared some creative ideas about identifying future plant characteristics based on the look or character of the seeds.
Let’s start by answering some questions you may have after hearing popular myths about the appearance of cannabis seeds and what people think it says about their quality:
Are light or dark weed seeds better?
It is fair to say that dark weed seeds are better for growing than light-colored seeds. This is because the dark color indicates the seeds have completed their journey from pollination to maturity. They have developed all of the protective shell structures necessary to survive until they find the right conditions to germinate and start the cannabis life cycle again.
On average, fiber cannabis types, which have been forcibly bred with low THC under hemp-growing laws in many parts of the world, tend to display slightly lighter shades of brown.
Can you recognize feminized or autoflower seeds?
Feminized and autoflower seeds look just like regular and photoperiod seeds. You cannot tell how long a seed will take to grow into a finished plant by looking at it.
Can you recognize if the resulting plant will be male or female?
It is impossible to recognize whether a resulting plant will be male or female by its seed’s observable qualities. Purchasing feminized seeds and ensuring they are kept separate from any other seeds in your collection is the only way to know your plants will grow to be female.

Shop Feminized Seeds
- Female plants for healthy bud
- Quality genetics, high yields
- All popular cultivars
Can you tell the strain by a cannabis seed?
You cannot tell the strain of cannabis by looking at a seed. A grower who produces seeds may notice they become familiar with how their seeds look when made by certain plants (as in the case of stabilized lineages). Still, the likelihood of identifying any given strain in, let’s say, a bag of random seeds is next to, if not entirely, impossible.
Can you even tell if a seed is indica or sativa?
You can’t tell if a seed is indica or sativa from its appearance.
Indica and sativa cannabis types grown for high cannabinoid content and easy cultivation are hybridized forms of plants selected for those features.
Unless (until?) you become as passionate about (might I even suggest “obsessed with”?) growing cannabis as some of us around here, most of the good seeds you will encounter in your life as a grower of high-quality cannabis will look very similar.
Should a cannabis seed have (tiger) stripes?
A lack of stripes is not a good reason to downgrade a cannabis seed, but the presence of stripes or mottling does indicate that its internal structures were mature at harvest.
Seed striping in cannabis is related to an evolutionary need for camouflage, protecting the seeds dropped by plants from being eaten (by birds, mainly). The genes of a subtype can retain this trait, but it may also not be part of that particular variety’s DNA expression.
The stripes on a cannabis seed are among the last characteristics to develop, and the layer in which they appear can sometimes be “sloughed off” in the collection and handling process.
There is no reason to insist that a cannabis seed should have stripes to be a good quality seed.

Does cannabis seed size matter?
Cannabis plant breeding (outside of “hemp” grown specifically for fiber) has created varieties that consistently make larger and more uniform seeds.
Larger seeds serve the interests of growers seeking more protein and oil from the seed. In the absence of pollination, this portion of the plant’s energy goes to creating the cannabinoid-rich oils found in and on the unseeded, tightly stacked, and plump buds.
The relative size of a cannabis seed does not matter when it comes to its eventual size: large cannabis seeds will not inherently make bigger plants.
What color should a good weed seed be?
Color is one important characteristic that seed growers use to evaluate whether their seeds are good enough to sell or to plant for the next crop. The color of the seed indicates its maturity at harvest. There is only a short window of time during which the contents of the seed are fully formed, and the outer shell of the seeds is not. For this reason, a good weed seed is generally dark in color.
Light or white cannabis seeds
Light or white cannabis seeds were pollinated closer to their harvest date than their counterparts on the same plant. As it takes a minimum of four, but usually more, weeks for cannabis seeds to become mature after pollination, the seed producer is occasionally forced to harvest their plants before some of the seeds have fully developed.
White or light-colored cannabis seeds can be just as viable as their dark-brown counterparts. However, they are more vulnerable to storage climate conditions (e.g., temperature fluctuations, humidity, dryness) and infection.
If you have white or light cannabis seeds, attempt to germinate them during the first growing season after you acquired them. Under ideal conditions, older white seeds may still germinate, but you are likely to see a reduction in healthy seedling rates the longer you wait to grow them.
Dark or black cannabis seeds
Dark or black cannabis seeds are ready to propagate their genetics at the time of harvest. High-quality weed seeds are usually dark brown, gray, or black in color.

Green cannabis seeds
A greenish-white cannabis seed is probably not completely formed inside, and a green color is a strong indicator it will not grow at all.
Cannabis seeds can retain a green tint until completely formed and dry in the buds. When they are complete, they are ready to withstand the period between the plant’s natural seasons of regrowth.
Sometimes, seeds are still slightly green because they are very fresh. A greenish-colored brown cannabis seed will usually darken as it dries, to the point where the green color fades or disappears. A green hue on cannabis seeds that was otherwise quite dark when the plants were cut down is not usually a concern.

How can you tell the quality of weed seeds?
You can tell the quality of weed seeds by using the same evaluation criteria as the growers who made them. In commercial seed production, no matter what type of plant is being grown, a uniform harvest of high-quality seeds is the goal.
When all the seeds in a pack look almost identical, the grower likely had a good handle on the variables to make vigorous seeds with high germination rates and a reasonable storage lifespan.
Look for fully-matured, oval-shaped seeds with a dark color and firm shell, with no signs of damage.

Shop High-Quality Seeds
- High-quality, hand-picked seeds
- The best genetics out there
- Delivery and germination warranty
Is the firmness of a marijuana seed an indicator of quality?
The firmness of a seed, which in agricultural regulations is called its “resistance to compression,” is one of the measurable indicators of maturity. Although you may be able to crush good quality seeds if you try (so don’t try too hard!), a seed’s firmness is an indicator that you have a good quality cannabis seed.
Older seeds can have thick shells.
Seeds with very thick outer shells make it hard for water to penetrate them. The thick outer shell of an older seed may have preserved its viability but may also make your germination period longer.
Seeds from different batches, harvested from differently mature parts of the same plants, or with different genetics can have varied shell thicknesses. Regardless, ideal germination conditions should be maintained even if the seeds of one type or source have already ‘popped’ (sprouted) while others lag behind.
Dry or brittle seeds
Seeds subjected to overdrying lose their ability to support themselves through germination. Dry or brittle seeds are considered poor quality.
What if your seed has a damaged or scratched shell?
If your seed has a damaged or scratched shell, you may consider this a lower-quality weed seed. Any damage sustained by the seed’s protective coating makes it vulnerable to the elements, compromising the viability of the contents.
Don’t throw it out, though. A scratched shell is not a reason to discard the seed without attempting to grow it. However, you should lower your expectations for successful germination.
Seed identification has great potential.
The future may hold fascinating new developments in seed quality and type identification. There is a resurging interest in sourcing, identifying, and protecting global cannabis genetic diversity.
Using cannabis seeds purchased at a market in Thailand in 2022, a group of scientists recently released the first known open-access dataset containing four thousand images for machine learning (AI-training) purposes.
With researchers all over the world studying and sharing information about cannabis and its seeds, new data may come out that will put some of the old myths to rest (or perhaps reveal exciting insights!).
Conclusion
Today, as growers, our ability to estimate the quality of seeds we intend to grow comes down to a few key aspects.
Observations of the seed characteristics and general appearance.
Does it look like it was mature when collected? Was it protected from damage throughout its post-harvest journey from the parent plant to the garden?
Trust in the seed producer.
Do you trust your source, especially their skills in cultivating, harvesting, and preserving high-quality cannabis seeds from healthy plants? Do you trust their quality control standards and guarantees?
Experience.
What data collection, documentation, and analysis of our own experiences growing high-quality cannabis seeds do you have? What can you tell from what you’ve experienced?
These are the three things you should always consider when evaluating cannabis seeds. However, when you start with brown, firm, uniform, and not visibly damaged seeds, you give yourself the best chance at success. For high-quality marijuana seeds with guaranteed germination, visit ILGM.com.
Learn more about cannabis seeds
Be sure to check out the following articles if you want to learn more about cannabis seeds:
Once you’ve got your hands on some high-quality cannabis seeds, don’t forget to download Robert’s free Marijuana Grow Bible and check out the ILGM Grow Support Forum to get growing!
If you have ever cured cannabis before, odds are you’ve had to burp your jars during the process. But have you ever wondered why burping weed is important? The short and sweet of it is that doing so removes the buildup of carbon dioxide and moisture in the jar caused by your buds.
As for why your buds release CO2 and moisture, it mainly has to do with the chemical reactions during curing. And unfortunately, there’s no short answer to this one. So if you want to know why burping weed is important, you’ll have to continue reading.
What is “burping”?
Burping weed is where you remove the lid of your curing jars to allow moisture and CO2 to escape. It’s done to release a buildup of water vapor and carbon dioxide in the jar caused by your buds as they cure. In a way you’re allowing air to circulate in your curing jars to avoid mold growth like jar rot which is caused by high moisture and humidity.
But why do your buds release carbon dioxide and water vapor? When it comes to moisture, it’s because of transpiration. Even after plants have been cut, transpiration can still occur in them. The same goes for your buds that have been dried. They will still transpire, releasing their leftover moisture as they cure which causes a buildup of it in the jars.
As for why your buds release carbon dioxide, it’s a byproduct of a chemical reaction that happens during curing to ‘activate’ the cannabinoids in the trichomes. Part of the reason we dry and cure our buds is to partially decarb them to convert the THCa in the trichomes into THC which makes for a more potent bud. An easy way to explain decarbing is that it’s a reaction which uses heat to remove a part(carboxyl group) from a chemical compound. In the process of removing that part, CO2 is released. For cannabis buds, this is removing a part in THCa which then converts it into THC(1).
Find a step by step guide to curing your weed for maximum yields in Robert’s Grow Bible below!
How do I burp weed?
Burping your weed jars is pretty straightforward. You open the lid of your jars and leave it open to allow moisture and carbon dioxide to fully escape. The question, though, is when should you start burping your jars? Without a hygrometer it’s hard to tell exactly whether you should open the lid of your jars to burp them.
It’s important that you don’t haphazardly open your jars. Doing so exposes the trichomes of your buds to too much oxygen which causes the terpenes in them to degrade, resulting in a loss of potency and flavor(2).
Should I burp my weed everyday?
Your buds will constantly release moisture and carbon dioxide as they decarb. So yes, you should burp your weed everyday and keep your jars open for at least 30 minutes. But this only applies to the first week of curing. During the second and the following weeks after that you will have to gradually reduce the amount of times you burp your jars.
This is where the hygrometer will come in handy. Typically when it comes to curing, you need to maintain a relative humidity of roughly 55-60% with a temperature of 18°C(3). This allows for a slow cure that will better preserve terpenes while still partially decarbing the cannabinoids of your buds.
| Week of curing | Number of burps |
| 1st Week | Once per day |
| 2nd Week | Once every other day |
| 3rd to 6th Week | Once every 2 weeks |
| Past 6 Weeks | Once every month |
When should I stop burping my weed?
The main purpose of burping weed is to let out a buildup of CO2 gas and water vapor, which means it shouldn’t take more than 30 minutes. Half an hour is all you need for your jars to return to an acceptable relative humidity for curing.
Another question is when can you stop burping cannabis? And the answer is: you don’t.
So long as your buds are curing, you have to burp them. Even after your cured buds have gone past 6 weeks, you would still need to burp them once every month to avoid CO2 from accumulating. This air exchange is vital in maintaining your buds’ potency and overall quality.
Combining burping with a high yield cannabis seed from ILGM will guarantee huge yields! Buy high yield weed seeds today!

Buy High Yield Seeds
- Beginner Friendly
- Easy to grow
- Guaranteed germination
- Grow guide available
What happens if you burp weed for too long?
One of the main issues with burping marijuana buds as they cure is overexposing them. While it is important to let excess moisture and carbon dioxide gas escape the jars, leaving the lid off for too long can release too much moisture. This causes your terpenes to evaporate along with the moisture, resulting in a loss of flavor and aroma in your buds.
But the problem of overexposure is a relic of the past thanks to humidity packs. These handy packets can help maintain a relative humidity in your jars by absorbing excess moisture in them. In some products like Boveda Humidipaks, they can also release moisture if the air is too dry. The only caveat, though, is that it cannot also absorb CO2 gas in the jar. Meaning you will still need to burp them.
Are burp lids good for weed?
Burp lids are a great alternative if you’re looking for a fast and easy way to burp your jars. The way it works is that the lid comes with a valve at the center. That valve can then have an oxygen extractor attached to it which will pump out stale air. It can also remove excess oxygen in the jar.
But do you need these ‘self’ burping jars to cure? No. They’re more of a commodity than a necessity. Your buds will cure just fine even if they’re manually burped. Plus, I personally believe a hygrometer is more necessary than auto burping jars. Since with a hygrometer, you can tell when you should burp the jars.

Other facts you need to know about curing weed
Why you should cure weed in the dark
When it comes to curing cannabis, it’s critical that they’re placed somewhere that’s dark, cool, and dry. The reason for this is that light, heat, and oxygen are factors that cause the cannabinoids in your buds to degrade(3). Especially light since it can also contribute to the heat in your curing room which will also result in your buds drying out too quickly. Moreover, UV light still plays a factor in affecting your buds, particularly in reducing both their terpenes content and THC content.
Why is curing weed important?
The main reason we dry and cure cannabis is to preserve them. Through curing we remove the bacteria and enzymes that cause the buds to break down and decay. What that means is that the terpenes and cannabinoids in the trichomes of the flowers are preserved.
Does curing increase smell?
Additionally, curing your buds helps accentuate the terpenes in the trichomes. This is because as your buds cure, it’s also breaking down things like chlorophyll, starch, and sugars. By removing those things, it gives your buds not only more aroma but even a stronger flavor and a smoother smoke. In addition to that, curing also helps further ripen the terpenes in your buds by giving it the time it needs to fully form within the trichomes. It’s the exact same reaction that occurs with the cannabinoids in the buds, wherein by giving it time to ‘ripen’ the THCa turns into THC.
A lot of effort and time goes into curing your cannabis. Especially if you have to manually burp your jars. That means you need to make sure that the buds you’re curing are grown from the best seeds which you can get from ILGM.com. Guaranteed to germinate and worth the effort to cure.
Does burping weed prevent jar rot?
Yes. By burping your jars, you prevent moisture from accumulating which avoids creating an environment where bacteria and mold can thrive. That’s not to say that burping will fix your mold issues. If your buds were improperly dried, odds are they’d still grow mold. Especially if the buds have a lot more moisture in them still.
Are auto burping jars any good?
If you’re looking for an easy and fast way to burp your jars, then yes. Auto burping jars or burp lids are a novel way to reduce the work around burping your jars. They are pretty expensive, though. Especially if you consider they’re a nice-to-have and not a need-to-have utility.
Can you cure weed in a plastic bag?
No. With plastic bags, they don’t offer a tight enough seal that makes them ideal for curing. So before you can even think of burping weed in turkey bags, you’ll find that your herbs have grown mold.
Citations

Growers who have handled hydrogen peroxide before know how potentially dangerous it is for plants. In high doses, it can cause cell damage. But, H2O2 is something that plants also produce during photosynthesis. It acts like a hormone that regulates growth and development.
In fact, H2O2 may potentially speed up the germination process and help your seedlings’ growth and health. If you’re curious to know how to germinate weed seeds with hydrogen peroxide, our step-by-step process will help you go about it.
Should you soak your weed seeds in hydrogen peroxide?
So long as it’s a diluted solution, soaking seeds in hydrogen peroxide is a great way to speed up germination. It’s also a good way to sterilize your seeds and remove any bacterial or viral pathogens. But you mustn’t soak your weed seeds for too long, or your seeds may decompose in the solution.
How does hydrogen peroxide help with germinating seeds?
Hydrogen peroxide is a chemical compound that acts like hormones for your plants and seeds. In plants, they regulate growth and development in the roots. For seeds, H2O2 triggers physiological processes like germination to occur faster(1). Another way that H2O2 speeds up germination is by cracking the seed’s outermost covering. Because seeds need water and oxygen to kickstart germination, breaking their seed coat allows for more of it to be absorbed by the seed.
You can also use H2O2 to germinate old seeds that have developed a harder seed coat over time.
Besides speeding up the germination process, soaking cannabis seeds in hydrogen peroxide also sterilizes them. In fact, it’s a better solution for your seeds and far safer than aggressive chemicals like bleach(4).
However, it’s critical that you don’t soak your seeds in pure hydrogen peroxide. The concentration of the hydrogen peroxide (water to H2O2 ratio) can make the difference between it being beneficial or detrimental. Too much H2O2 will damage your plants’ cells or kill your seeds. Ideally, use a 1% H2O2 solution; this is enough to show the best results for cannabis seed germination (3).
Find a step by step germination guide in Robert’s Grow Bible below.
Does H2O2 speed up the germination process?
Yes, H2O2 does speed up the germination process. It is a signaling molecule that triggers physiological and biochemical processes in your cannabis seeds, which then induces germination. Additionally, H2O2 is regarded as one of the most stable signaling molecules for cannabis (1). Unlike other compounds, H2O2 requires a specific enzyme to decompose(5), making it ideal for creating seed-soaking solutions.
What happens if you use too much hydrogen peroxide?
When soaking seeds in water and hydrogen peroxide, it’s common to make mistakes around the concentration levels. Note that 10% hydrogen peroxide is the concentration for weed killer, and it will also kill your plants (6). The recommended solution is 1-3%. Any solution that contains more than 3% can do more harm than good for your seeds.

How long should you soak your seeds in hydrogen peroxide?
We recommend that you only soak your cannabis seeds in the hydrogen peroxide solution for no more than 12-24 hours(4)(1). This is because your seeds will usually show signs of germination around this time frame. To keep your newly germinated seeds from drowning and decomposing, don’t go over 24 hours. This would not be the case if you were soaking your seeds in water alone.
What is the ratio of water to hydrogen peroxide to use for seeds?
One of the most important things to take into consideration when making a hydrogen peroxide solution is the concentration. H2O2 comes in different strengths, and each one requires different amounts of water to dilute it into a solution that’s safe for soaking weed seeds. This chart details the ratio of water to H2O2 needed for making a soaking solution for your seeds.
| Amount of water | 3% H2O2 | 35% H2O2 |
| 1 cup | 1 and ½ tsp. | 7 to 10 drops |
| ¼ gallon | 2 tbsp. | ½ tsp. |
| 1 gallon | ½ cup | 2 tsp. |
| 5 gallons | 2 and ½ cups | 3 tbsp. and 1 tsp. |
| 10 gallons | 5 cups | 6 tbsp and 1 tsp. |
| 20 gallons | 10 cups | ¾ cups with 1 tbps. and 1 tsp. |
Can you germinate older seeds with H202 (hydrogen peroxide)
It is certainly possible to germinate older cannabis seeds with hydrogen peroxide. The only issue with germinating old seeds is their harder seed coat(11). You need to crack that tough seed coat to germinate them, which is possible by using H2O2. You won’t need to make a higher concentrated solution for it either. The same 1% H2O2 solution you use for regular seeds is enough to germinate older ones(3). So if you have a bunch of old seeds you didn’t find the time to sow, don’t just throw them away. They may still be viable.
But, it’s only possible to germinate old seeds if they were stored properly. Just like with storing buds, if you don’t give your seeds the right conditions, they won’t last. For more on storing your seeds, read the article, how to store cannabis seeds. Or if you don’t trust you old seeds, check out collection of high yield marijuana seeds today!
Buy High Yield Seeds
- Beginner Friendly
- Easy to grow
- Guaranteed germination
- Grow guide available
How to use hydrogen peroxide for germinating marijuana seeds
Disinfect growing medium
Besides using hydrogen peroxide to soak your marijuana seeds, you can also use it to disinfect your growing medium by applying the diluted solution as if you’re watering. Doing so eliminates harmful fungi like fusarium from soil-growing mediums and increases seedling growth in plants(7). Applying H2O2 on soil has the added benefit of remedying heavy metal-contaminated soil(8).

Seed sanitization
Because of hydrogen peroxide’s oxidizing properties, it is a good disinfectant that removes bacterial and viral pathogens and stops fungal infections. It’s the best solution if you want to sterilize your seeds. Other alternatives like mercuric chloride or bleach require additional washing of your seeds(4). For this method, soak your seeds in a 1% solution and let them sit for 12-24 hours or until most seeds have germinated.
Faster germination
Like sanitization, use hydrogen peroxide for faster germination by soaking your seeds in a 1% solution for 12-24 hours. H2O2 can speed up the germination process in seeds because it acts as a trigger for germination, which would otherwise take twice as long if you were to soak them in water(1). In older seeds with thicker seed coats, H2O2 breaks open the hardened outermost cover, allowing more oxygen and water to be absorbed by the seed.
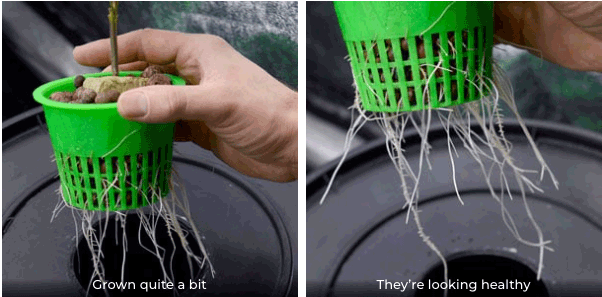
Increased cannabis seedling root development
Promoting root development is another benefit of using hydrogen peroxide on your cannabis. Watering with your H2O2 solution increases O2 concentration in the soil, which increases nutrient and water uptake and has a positive effect on root growth(9)(10).
Fight off fungus infections
In the same vein, watering your cannabis with your hydrogen peroxide solution helps fight off fungal infections in your plants, particularly in its roots which play a considerable role in increasing root development. It’s important to note that you need to be careful with how much H2O2 you introduce to your cannabis, which is where the chart will come in handy.
But with that said, you don’t have to trouble yourself with all of this. Unless you just want to salvage some old seeds you forgot to plant, you’re better off purchasing high-quality seeds from ILGM – they’re guaranteed to germinate. You can also check out our germination instructions for more information.
FAQs about using hydrogen peroxide with cannabis
Can you treat root rot with hydrogen peroxide hydroponics?
Yes you can. Outside of cutting off the damaged parts, you can use a mixture of hydrogen peroxide and water to treat root rot in your cannabis plants.
Should you dilute hydrogen peroxide solution when using it for germination?
When using hydrogen peroxide for germinating cannabis seeds, you must dilute it before you soak your seeds in it. Undiluted H2O2 will only damage your seeds.
Does H202 help with mold on cannabis plants?
Spraying your cannabis plants with a diluted hydrogen peroxide solution can help reduce the likelihood of mold appearing. However, it’s more of a preventative than a remedy. It won’t help much if your plants are already infected with mold.
Citations
- The role of hydrogen peroxide in regulation of plant metabolism and cellular signalling in response to environmental stresses by Slesak I., Libik Marta., Karpinska B. – https://pubmed.ncbi.nlm.nih.gov/17325747/
- The effects of hydrogen peroxide on plant growth, mineral accumulation, as well as biological and chemical properties of ficus deltoidea by Nurnaeimah N., Nashriyah M., Mohd K.. – https://www.mdpi.com/2073-4395/10/4/599
- Development and standardization of rapid and efficient seed germination protocol for cannabis sativa by Sorokin A., Yadav N.S., Gaudet D. – https://www.ncbi.nlm.nih.gov/pmc/articles/PMC7952943/
- Transient expression of β-glucuronidase gene in cannabis sativa varieties by Sorokin A., Yadav N.S, Gaudet D. – https://www.researchgate.net/publication/342259283_Transient_expression_of_the_b-glucuronidase_gene_in_Cannabis_sativa_varieties
- Antioxidant status in pesticides-exposed agricultural workers by Abdel-Shafy E.A. – https://www.sciencedirect.com/topics/pharmacology-toxicology-and-pharmaceutical-science/catalase
- Using hydrogen peroxide – https://www.using-hydrogen-peroxide.com/gardening-with-hydrogen-peroxide.html
- Effect of hydrogen peroxide on the soil microbial community structure and growth of Malus hupehensis Rehd. Seedlings under replant conditions by Xu X., Zhou Y., Wang X. – https://pubs.acs.org/doi/10.1021/acsomega.2c06665
- Study on the possibility of hydrogen peroxide pretreatment and plant system to remediate soil pollution by Lin Q., Chen Y., Wang Z. – https://pubmed.ncbi.nlm.nih.gov/15519388/
- Apoplastic hydrogen peroxide in the growth zone of the maize primary root. Increased levels differentially modulate root elongation under well-watered and water-stressed conditions by Voothuluru P., Makela P., Zhu J. – https://www.frontiersin.org/articles/10.3389/fpls.2020.00392/full
- Oxygen diffusion in soils: Understanding the factors and processes needed for modeling by Roman J.N, Ortiz M., Morales-Salinas L. – https://www.researchgate.net/publication/280557990_Oxygen_diffusion_in_soils_Understanding_the_factors_and_processes_needed_for_modeling
- Seed Structural Variability and Germination Capacity in passiflora edulis sims f. edulis by Castillo N.R., Melgarejo L.M., Blair M. W. – https://www.frontiersin.org/articles/10.3389/fpls.2020.00498/

Pot prohibition costs Florida at least $200 million per year

Union’s initiative to organize Oregon marijuana workers nears ballot

Cannabis and Mental Health: Recent Research and Implications

Why You Shouldn’t Vote for Kamala Harris Just Because of Her Position on Cannabis- Banana in the Tailpipe, Again?

Your Trusted Amsterdam Seed Bank – Powered by Mother Nature, Breeding since 1996

Sam Hilliard’s clutch homer, Ezequiel Tovar’s walk-off send Rockies to win over Red Sox in 12 innings

Keeler: Trevor Story returned to Denver, but it was Rockies fan, transplant survivor who rocked Coors Field

As Trevor Story returns to Coors Field for first time since signing with Red Sox, injury-riddled shortstop remains confident he can regain old form

More RTD "slow zones" added as summer repairs move forward

Canadian wildfire smoke triggers poor air quality, health advisories in Colorado

Distressed Cannabis Business Takeaways – Canna Law Blog™

United States: Alex Malyshev And Melinda Fellner Discuss The Intersection Of Tax And Cannabis In New Video Series – Part VI: Licensing (Video)

What you Need to Know

Drug Testing for Marijuana – The Joint Blog

Cannabis, alcohol firm SNDL loses CA$372.4 million in 2022

NCIA Write About Their Equity Scholarship Program

It has been a wild news week – here’s how CBD and weed can help you relax

City Of Oakland Issues RFP For Employee Training Programs

A new April 20 cannabis contest includes a $40,000 purse

Your Go-To Source for Cannabis Logos and Designs
-
 Cannabis News1 year ago
Distressed Cannabis Business Takeaways – Canna Law Blog™
-
 One-Hit Wonders1 year ago
United States: Alex Malyshev And Melinda Fellner Discuss The Intersection Of Tax And Cannabis In New Video Series – Part VI: Licensing (Video)
-
 Cannabis 1011 year ago
What you Need to Know
-
 drug testing7 months ago
Drug Testing for Marijuana – The Joint Blog
-
 Marijuana Business Daily1 year ago
Cannabis, alcohol firm SNDL loses CA$372.4 million in 2022
-
 Education1 year ago
NCIA Write About Their Equity Scholarship Program
-
 Cannabis1 year ago
It has been a wild news week – here’s how CBD and weed can help you relax
-
 Education1 year ago
City Of Oakland Issues RFP For Employee Training Programs