

Grow Mediums
Best cannabis bud sweeteners
When you want to grow sweet cannabis, you may be tempted to look for an out-of-the-box, one-size-fits-all, “enhancing” product, but making buds sweeter is a bit more complex than simply “buy and apply.” However, you’ll understand why bud sweeteners are a popular choice among growers willing to go that extra mile for the quality of their yields.
What are cannabis bud sweeteners?
Bud sweeteners are a category of crop additives that increase the production of the phytochemicals (plant-derived, organic molecules) that humans perceive as “sweet.”
Sweetness is a scent and flavor profile found naturally in many cannabis varieties. Sweet cannabis types exude smells that remind us of other sugary things. These cultivars are often named for candies and baked goods (for example, Bubblegum, Zkittlez, Gushers, Sunset Sherbet, Cookies ’n’ Creme, Girl Scout Cookies, Do-si-dos, Tropicana Cookies, or Wedding Cake).
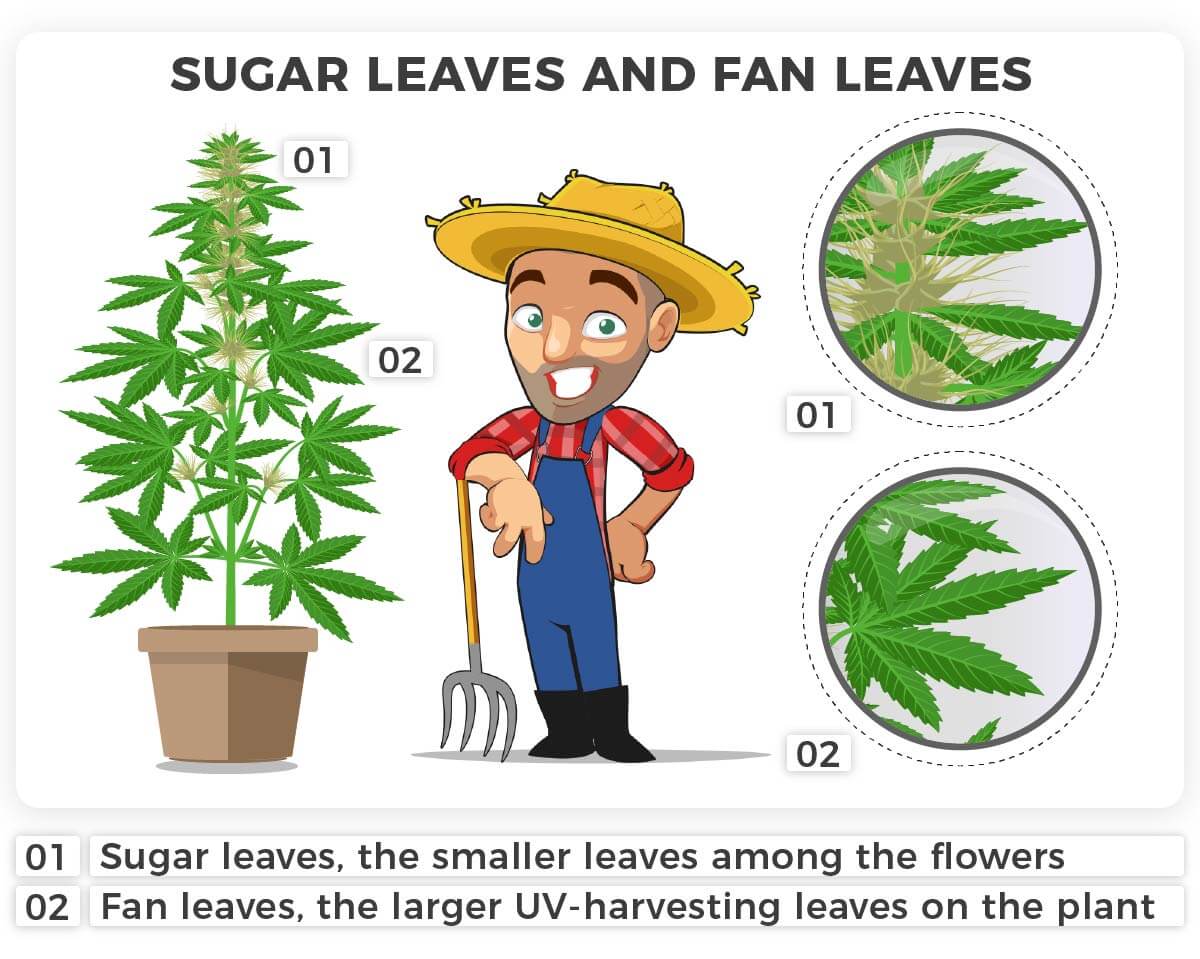
The concept may be a bit confusing since, in cannabis culture, glandular trichomes are often colloquially referred to as “sugar.” We might also refer to “sugar leaves” as the leaves growing among the flowers as they develop. These leaves are also covered in trichome heads, unlike the larger, sun-energy harvesting “fan leaves.”
So when we talk about “sweetening” buds, it may refer to getting more of those sweet tastes, but it can also be about producing more glistening, cannabinoid-rich trichomes.

What do cannabis bud sweeteners do, and how do they work?
The best bud sweeteners elicit the plant’s natural desire and support their ability to produce the inherent, genetically-specific, sweetness-evoking terpenes.
To understand how bud sweeteners work, it’s important to understand why marijuana plants make terpenes in the first place.
Terpenes serve many purposes in the lives of plants; they send sensory signals — which we perceive as smells and flavors — as they evaporate, attracting those which will benefit them and repelling those which will harm them.
Bud sweeteners feed the beneficial microbes that live in your plant’s root zone, giving them the energy to thrive and out-compete destructive pests and diseases. Some of these microbes are also responsible for transforming local food supplies into more bioavailable (absorbable/digestible) forms, allowing your cannabis to use a greater proportion of its energy to develop strong branches and heavy flowers.
The best bud sweeteners also contain seaweed (kelp), benefiting cannabis not by providing additional essential NPK nutrients (Nitrogen, Phosphorus, and Potassium) but by increasing its ability to harvest and efficiently use available light and nutrients.

How do you use bud sweetener during the growing stages?
As you and your plant share the goal of growing the healthiest, biggest, oil-rich flowers, the flowering stage is when you want to boost the capacity of your plants to make the best use of available nutrients for stacking juicy, “loud” (if our noses could hear) buds.
Apply bud sweeteners as a soil drench when plants are ready to flower and supplement PK-dominant nutrients with bud sweetener at each feeding.
Typically, sweet terpenes are produced by plants when they are blooming; their flowers are scented to attract beneficial insects. In non-cannabis plants, these include pollinators; for cannabis, which relies on wind pollination, it’s the insect-eating insects that are lured by these scents.
Are bud sweeteners a good idea?
Giving your plants every opportunity to be at peak performance throughout their life cycles is a good idea. If an amendment encourages and supports the production of terpenes in greater abundance and benefits microbial partners, the plant is likely going to be more robust and grow to its maximum potential.
The best cannabis bud sweeteners available today
I would argue that the best cannabis bud sweetener is the one you make yourself. Homemade bud sweeteners are not necessarily expensive or complicated to put together, and, like bringing a batch of fresh home-baked brownies to your loved ones, it feels good to feed that craving and see it produce a positive response.
Of course, depending on your personal style, experience level, and the scale of your grow, commercial products might be more appealing and give you a place to start. There are plenty of companies that offer amendments designed for this purpose.
Seek one that specifically feeds your plant’s partner microbes in the growing medium; most will have either “sweet” or “sticky” in the name (or both, like Humboldt’s Secret ‘Sweet and Sticky’), or reference sugar or terpenes in their titles.
Aside from brand loyalty, budget, and local availability/access, your own research and experimentation will determine whether a formula is right for your favorite cannabis cultivar — make sure to take note of the ingredients listed, follow mixing instructions, and track your results to make the most out of your purchase.
Homemade cannabis bud sweetener
A simple homemade bud sweetener mainly consists of plant-sourced carbohydrates (sugars). Many growers use blackstrap molasses because it contains minerals lost in the refining process for white sugar. Fermented plant juice (aka FPJ, in Korean Natural Farming (KNF) lingo) supplemented with kelp extract is also a good base recipe.

In either case, a little goes a long way; 1 to 3 teaspoons (5-15ml) per gallon is all you generally need to add to your flowering stage feeding regimen.
Traditional KNF methods also recommend irrigation with a 10% seawater dilution, claiming it sweetens fruit in the final weeks of growth. This step may create minor stress on the plant tissue, eliciting it to push harder toward its self-propagating goal. If you live near the ocean, give it a try!
Enhancing the flavor and aroma of cannabis flowers
Ensuring that the nutritional building blocks for these molecules are abundantly available and easily absorbable while the cannabis buds are forming will enhance the flavor and aroma of cannabis flowers. Harvesting at the right time, and treating your buds with due care at maturity, will also ensure you have flavourful and aromatic flowers in your stash.
Before harvest
To bring out the full sweet potential of your chosen cannabis genetics, prepare to give your plants good reason to produce more terpenes and support them with the nutrients they need.
Try growing in living soil because the intricacies of localized biology will expose your plants to natural challenges that trigger their immune systems and drive their desire to survive and continue the species.
When exactly to harvest is a personal choice and will be dictated by a combination of factors. Check out Robert’s Harvest Guide and Grow Bible for more guidance on how to make this decision.
During harvest
Deploying a staggered harvest is an excellent way to improve the sweetness of your crop as a whole. If your labor power is well matched to the size of your grow (in number or size of plants), cut and process the biggest, most mature flowers at the tops of your stalk and branches at their peak. Allow the slightly younger, secondary, and smaller buds to swell to their full capacity with gorgeous terpene and cannabinoid-rich resin before bringing them down.

You don’t have to be overly precious with your plants as you crop out (harvest), but you also shouldn’t beat them up needlessly. Many growers have adopted a gentle wash in an effort to remove any residues, dirt, or insects from their flowers before they are dried. This could also have some (perhaps minor) impact on the taste and smell of the final result.
After harvest
Historically, where cannabis is treated as a street drug rather than the holistic herb we know it to be, all kinds of bud doctoring techniques have been deployed to increase “bag appeal” and disguise lower-quality products. I do not recommend using any tactics that attempt to infuse essential oils into or spray onto already-harvested plant material. These oils are generally not designed for inhalation after exposure to combustion-level temperatures.

Using proper post-harvest drying, curing, and storage practices means you will not need to resort to such tactics. You can preserve the smell and potency of your buds by using time-proven herbal processing techniques.
Make sure your harvested buds remain at their sweetest by:
- handling them with care to prevent undue loss and breakage of trichomes
- keeping them out of the sunlight
- drying them at relatively low temperatures
- transferring small stem sections to paper bags to finish once partially dry (where the risk of mold is less present)
- storing in glass jars with good seals after a final trim
Final thoughts
Bud sweeteners are sometimes brushed off as hype. In some cases, this opinion is fairly justified; especially when used in situations where they will mostly be flushed away quickly or have no mechanism to benefit the plants (e.g. when the grower uses an inert substrate, and there are no microbial partners to feed).
Pairing with the right genetics, and giving them plenty of love and care, will surely lead to satisfying results.
Perhaps, then, it’s the high-quality relationships you build in your garden’s community that are the best bud sweeteners of all —
How sweet is that?
For all you need to get growing, don’t forget to download Robert’s Marijuana Grow Bible, check out other articles on this site, and visit our seedbank to pick up the sweetest selections for your next gardening adventure!
[We really couldn’t make this easier — find your new best bud in the Sweet Mix, Autoflowering Sweet Mix, Baking Mix, or Fruity Mix Packs!]
For those ready to break the routine of growing organic Cannabis, deep water culture (DWC) is an advanced growing method for large yields using a soilless growing medium. For certain growers, this method may be music to their ears.
In this article, we break down all you need to know about DWC, including how it works, the pros and cons, and how to set up and maintain a system. We’ll also provide an understanding of pH and EC and our top tips when growing cannabis with deep water culture.
What is DWC, and how does it work?
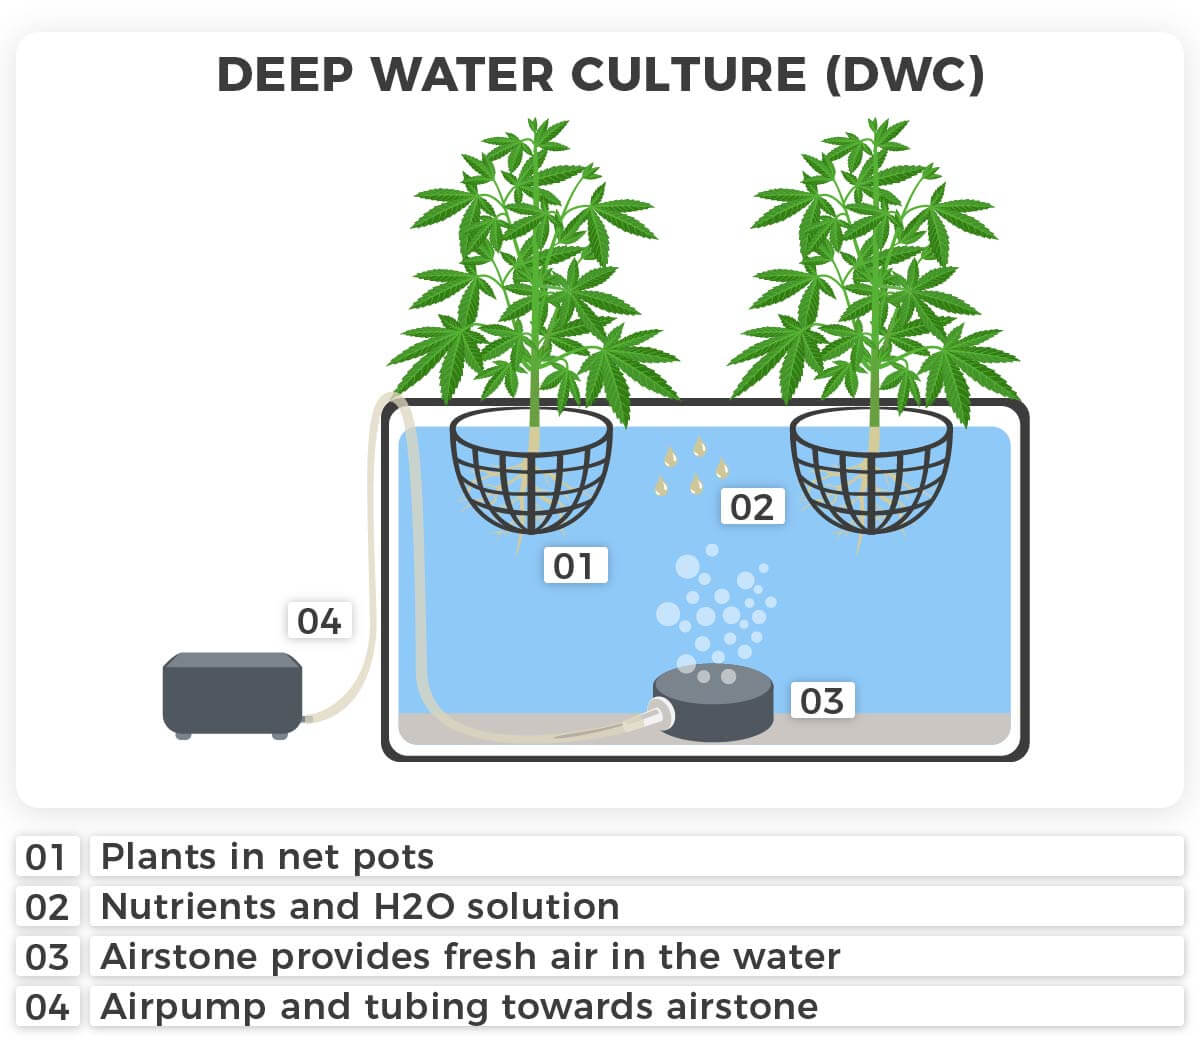
Basically, Deep Water Culture is a nontraditional way of growing cannabis. It requires a 4 – 5 gallon / 15-20 liter bucket, an inert growing medium, and a nutrient solution. The plant’s roots stay permanently submerged in the nutrient solution. Dissolved oxygen produced using an electric air pump and air stone creates the ideal growing environment for roots.

Because you can choose the nutrient concentration over time, your cannabis plants will grow much quicker during the vegetative stage using a DWC system and produce heavy yields once flowered. Depending on the cultivar, the final size of a plant flowered in DWC can be between 75-150 cm tall.
The pros and cons of Deep Water Culture for cannabis
Out of all the hydroponic systems, it is fair to say that deep water culture hydroponics is the most complex. It also has the highest risk-to-reward factor. There are both pros and cons to growing cannabis using DWC, which I’ll cover below.
The pros of DWC
- Faster growth – When it comes to turnaround time and return on investment, faster growth during the vegetative stage (18/6 light cycle) lets a grower flower their plants and harvest quicker than a traditional 6-8 week growth period. This means more harvests per year and, ultimately, more return on investment.
- Massive root mass – When roots are left submerged in an oxygen-rich environment, the ability of a cannabis plant to produce a larger root zone is easy. The bigger the roots, the more hydroponic nutrient solution the plant can absorb, producing big, dense, and resinous buds.
- Access to nutrients 24 hours a day – One of the best things about DWC is that you can’t overwater your plants, thanks to the gentle jacuzzi of bubbles they’re chillin’ in. Combined with access to primary nutrients and trace minerals, it’s no wonder DWC stands out from the rest when talking about yield potential.
- Increased yields – Many frustrated organic growers reach their turning point when constantly producing small-yielding crops. It is possible to increase yields by 200-300% when growing fruits and vegetables with hydroponic methods, and the same certainly applies to cannabis buds.
- Homemade systems – Designing custom DWC systems is easy and won’t break the bank. You only need a bucket with a lid, net pot, coco jiffy, or a piece of rockwool to start the seeds inside and some hydroton clay balls. You can pick up a fish-tank-quality air pump and air stones at your local pet store or garden supply store.
The cons of DWC
Now that we have covered all the benefits of jumping ship to DWC, it is time to discuss all the downsides of this (potentially) expensive indoor hobby.
- Power cuts and air pump failure – All hydroponic systems require either a water pump or an air pump, which all have moving parts and require an electric source for power. A failed air pump or long-term power cut can cause devastating losses to mature DWC plants. Those who do not have a backup pump will have a limited amount of time to fix the problem.
- Noisy and rattling air pumps – When discretion and stealth are important for an indoor grower, coping with the noise created by whirring exhaust fans, oscillating fans, and grow lights can be a headache, especially when you live in a residential building or close to a neighbor. Be prepared for a loud, floor-shaking humming noise when running your grow.
- Root rot – This is often the number one cause of all major problems when growing with deep water culture. Sometimes, the water temperature or lack of oxygen can cause plant roots to turn from a bright white to a dark yellow and soggy texture overnight. The solution to root rot is to bathe the roots in 3-10% hydrogen peroxide, depending on the needs of the plants.
- Water temperature – You’ll need a heater to keep the water temperature consistently 18-20 degrees Celsius / 65 – 68 degrees Fahrenheit. You must be able to increase or lower the temperature as needed, as consistency is key when using deep water culture systems.
- Costs of nutrients and manual labor – Deep water culture can become an expensive game, as filling up 4 – 5 gallons (15-20 liters) frequently with several different nutrients is costly. This is especially true when an issue necessitates changing and refilling the reservoir. Be prepared for frequent reservoir changes and invest in plenty of nutrients, as running short is not really an option.
How to set up a deep water culture system
Time needed: 1 day
Setting up a deep water culture system step-by-step
- Step 1
Remove the bucket lid and place the air hose/air stones at the bucket’s base. Then, fill with water until the net pot’s base meets the water’s surface.
- Step 2
Fill the net pot with hydroton clay balls. Wash the clay balls until the sandy brown residue is completely gone.
- Step 3
Insert your rockwool cube or coco jiffy containing your cannabis seeds into the hydroton clay balls. You will want the roots to be able to sit in the hydroton and slowly work their way down.
- Step 4
Mix your deep water culture nutrients into the water and check the pH and Electric Conductivity (EC) levels. You can adjust the pH level if needed using drops of acid or alkaline.
- Step 5
Plug the air pump in and check the air stones are producing tiny bubbles. Check the water temperature and use an aquarium heater or water chiller.
How to maintain systems and care for your cannabis plants using a DWC setup
Once you have filled your buckets with a nutrient solution and turned the air pumps on, you are ready to start your career as a hydroponic grower. However, there are a few variables to consider when looking after the systems and maintaining quality control.
- Water quality – The quality of your water source will determine how many nutrients you can give your plants. Generally, reverse osmosis (R/O) water is the best starting point for a first-time hydroponic grower. R/O water has a minimal EC, allowing the plants to absorb more nutrients. Using soft water over hard water is always the best bet when using deep water culture systems.

- Air pump – Air pumps left on 24 hours a day for months may begin to fail and dip in performance. You should expect this with any electric equipment composed of moving parts. Buying a new air pump every few harvests is always a good idea, and backup air pumps are a must!
- Temperature of the nutrient solution – For the roots of a cannabis plant to take in the primary and trace elements available, there needs to be a balance between the pH of the solution, EC level, and water temperature. A heater set to 64.5 degrees Fahrenheit (18 ℃) or a water chiller will be the best options to maintain consistency.
A freshwater supply for healthy roots
Because the roots of your cannabis plants secrete toxins over time, it’s important to replace the water in your reservoir often. These toxins cause the water’s pH to drift – either increasing or decreasing. This is also how plants can absorb precisely what nutrients they need. Changing the reservoir with clean water is essential, especially during the flowering stage.
Healthy roots growing in the ideal environment will be similar to white noodles, with fishbone characteristics. The roots will be compact and well spread out and, when taken out of the water during the reservoir change, have a well-developed and heavy mass.
Important notes:
- Plants release toxins from their roots and pollute the water.
- There will be a gradual increase in the strength of the nutrient solution over time.
- Roots should be shiny white in appearance with fishbone root characteristics.

Understanding pH and electric conductivity (E.C)
In the way that growing organic cannabis needs a nutrient solution in a certain pH range, the same applies to deep water culture. The term pH means Potential Hydrogen. It determines if the water is acidic, alkaline, or neutral. Hydroponic systems will produce the best results when the provided nutrient solution has a pH level of 5.5 – 6.5. You can easily adjust the pH of a nutrient solution using drops of pH up or pH down.
Electric conductivity refers to how much salt is present within a water source, determining how much conductivity the solution will have. As plants mature, their ability to uptake a higher EC increases, letting them grow fast and produce abundant buds.
The best way for a first-time grower to accurately check their pH or EC is by using digital pens. Some pens can check both depending on their settings. These $15-$30 devices will produce a digital reading for you and are a lifesaver for all types of hydroponic systems.

How does DWC differ from other hydroponic methods?
When it comes to the various hydroponic systems, DWC will be the highest-yielding. However, it is undoubtedly the most complex and expensive due to the high volume of nutrients.
From a skill level, it can be the least forgiving hydroponic system, requires vigilance, and the risk-to-reward factor is much higher than other systems. Below are other hydroponic systems to consider if you are new to hydroponics and wish to work your way up the ladder in terms of skill and experience.
- Flood and drain systems – Not as popular as they once were in the old days, flood and drain systems require a table and reservoir connected to a pump. Nutrient solution rises and floods the rockwool cubes or hydroton for a short period of time. Flood and drain and Sea of Green setups go hand in hand and were very popular once upon a time.
- Dripper systems – Described as the entry-level point for those jumping from organic to hydroponics, dripper systems that feed the plants for 15 minutes per time are very practical to use and eliminate the thought of hand watering an entire room or warehouse of cannabis plants.
- Nutrient film technique – NFT tables allow the roots of your cannabis plant to sit on a table and access a fine film of nutrient solution. NFT also helps plants become enormous in a short time. Growing plants using nutrient film technique systems requires a short vegetative time of 7–10 days at the maximum before flowering under a 12/12 light cycle.
- Aeroponics – Originally the brainchild of NASA scientists who wanted to grow vegetables in space, aeroponic systems are designed almost identical to deep water culture buckets. However, with aeroponics, you use a spray nozzle to wet the roots with a nutrient solution. There are two types of aeroponic systems- low pressure and high pressure – both require different nozzle sizes and water pressure levels.
- Aquaponics – You will most likely never try aquaponics or see an aquaponics garden growing cannabis. Aquaponics involves using living fish and a specific food source. You then allow the roots to submerge inside the tank. Imagine DWC on a massive scale outdoors with carp fish, and then you will get the idea.
- Reverse Deep Water Culture (RWDC) – Once you have mastered DWC, the next level is using an RWDC system, housing many buckets together simultaneously. This system acts as a network of connecting buckets that uses one main reservoir output. RWDC requires an advanced skill level and plumbing work when setting up.

Get your hydrophonic seeds
Flushing cannabis plants using deep water culture
When growing cannabis using an organic growing medium, it is necessary to flush the roots with plain water for at least 14 days. You flush cannabis plants in the first place to promote the use of internal nutrient reserves and allow the undissolved accumulated salts to break down and wash away.
Flushing cannabis plants with deep water culture systems only requires one week of flushing programs, usually performed with reverse osmosis water or an enzyme solution. A well-flushed plant grown in DWC should have a smooth, flavorsome, and mouth-watering taste with a soft and gray ash quality. The joints should burn uniformly and not require constant lighting or cause unwanted coughing fits when smoking.
My top tips for growing cannabis in deep water culture
Top Tip #1 – Having a backup air pump is one of the best pieces of advice I can give you. There is nothing worse than the heart attack feeling of hearing your room silent and the pumps not working. Have at least one extra pump in the event of an emergency.
Top Tip #2 – Dissolved oxygen increases the pH of water, so keep this in mind when supplying excessive amounts of air. Find an air pump that provides the ideal amount of oxygen without causing the pH to drift too much.
Top Tip #3 – When making a nutrient solution, I recommend adding your nutrients first, then adjusting the pH level of the nutrients’ solution afterward. Doing this can save you from performing the task of adding pH up or down twice every time.
My final thoughts on DWC
Making the jump to hydroponics after decades of growing can be both a breath of fresh air and a new challenge and discipline to master. I recommend starting with a dripper system. Over time, work up your skill level and experience to the point that you are more than comfortable with the fast-paced and expensive world that comes with deep water culture.
I hope this article will help you better grasp DWC and allow you to take your yields to the next level! For more information on growing and harvesting, check out Robert Bergman’s Grow Bible!
There are many different ways to cultivate cannabis plants, each with pros and cons. You must consider them when choosing your best style. Personally, my favorite method is living soil. At first glance, it may sound daunting and super scientific with big words like rhizosphere, biodynamic, and flocculation, but rest assured, living soil is as easy, if not easier, than any other cultivation method.
This article will answer all your questions about living soil, like how to make it, the difference between living soil and super soil, and how to use it to grow auto flowers. But we’ll start with the most important question: Why should you grow in living soil?
What is living soil?
Living soil has gained popularity in the past decade as part of modern agriculture’s organic and regenerative movements. Living soil for cannabis is a biodynamic medium that takes philosophies from microbiology and nature to produce a sustainable and cost-effective way to cultivate cannabis.
Organic living soil is special because it is bursting with billions of living beings, such as an array of bacteria, endo and ectomycorrhizae, trichoderma, protozoa, nematodes, and more. These organisms create a healthy soil food web which helps with decomposing organic matter into food for your plants.
Add natural amendments and different types of bacteria and fungi to your existing soil to start formulating your own living soil. The different life forms make a microscopic self-sustaining community in the soil.
If you want to learn more about the best soil to grow your cannabis with as well as how to grow cannabis from seed to harvest, checkout our legendary Grow Bible.
Why choose living soil
Living soil for weed is a great choice for cultivating. The soil is reusable, making it very cost-effective, and the amendments used to fertilize the soil are relatively inexpensive compared to most salt or mineral-based fertilizers.
Live soil also produces cannabis plants with higher terpene contents, leading to flowers with potent aromas and flavors. The microbiology in living soil also helps the cannabis plant naturally fight off disease and pests, so you won’t have to use as many pesticides while you grow.
Living soil is also extremely simple to grow in since you won’t need hundreds of bottles of various fertilizers to irrigate with. You can basically get away with irrigating with plain water or compost tea for added nutritional and biological benefits.
How does living soil work?
Living soil provides nutrients to your plants by breaking down amendments in the soil and turning them into food. Hundreds of different organic amendments, such as kelp, worm castings, and alfalfa meal, can be added to any type of soil. They all bring different nutritional compositions to your medium to be broken down by your microbiology.
Different bacteria and fungi help break down these different types of organic matter and turn them into food for your plants. So, by consistently feeding this microbiology in your soil, you feed your plants while feeding the microbes. This creates a self-sustaining ecosystem of life that helps bring life to your garden. Pretty cool, right?!
Bacteria
Bacteria play a huge role in living soil for cannabis. They provide a type of reserve for the plant by eating up the decaying matter and metabolizing it into plant-available nutrients stored in their cellular structure. This helps keep nutrients in the soil. Since the bacteria are bound to the soil particles, stored nutrients are not leached out of the soil during watering.
The beneficial bacteria also help keep the plant healthy because they outcompete bad bacteria in the root zone allowing their populations to remain almost nonexistent.
Fungi
Fungi play one of the biggest roles in living soil. Beneficial fungi, like bacteria, outcompete bad fungi, such as fusarium and pythium, which can devastate plants. Beneficial fungi also help break down amendments and create food reserves called exudates, where the plant roots can tap into plant-available forms of nutrients.
Mycorrhizae is a very popular class of fungi that help boost root health, have a symbiotic relationship with the plant, and help boost overall health as well. Forms of fungi such as glomus and trichoderma are the most common fungi inoculated in living soils.
Worms
Other common biology for living soils are nematodes and worms. Nematodes are basically microscopic worms that mainly help with pest control. They will eat away at larvae and eggs of pests in the plant’s root zone and also help mineralize nutrients found in the beneficial bacteria and fungi in the soil.
Worms are the most important life forms in living soil for multiple reasons. They help aerate the soil by burrowing around the soil, looking for food, and the food (e.g. dead plant material, food scraps) they eat turns into a biodynamic compost known as worm castings. These castings (worm poop) add microbiology and nutrition back into the soil and helps build soil structure and improve the texture of the soil.
Worm castings are one of the most essential elements to any living soil; the proof is in the poop!
The best worms for living soil are red wigglers and European nightcrawlers. Red wigglers are small worms that move fast. They are also the fastest at making worm castings. European nightcrawlers are larger and slower moving, but they help aerate soils faster due to their larger size.
By adding different amendments and compost, these different types of microbiology create a vast community that works symbiotically to keep your plants healthy and ensure all of their needs are met.
What is the difference between super soil and living soil?
Growers sometimes use living soil and super soil synonymously, but there are a few differences. You can use the same ingredients to make a living soil, but the main difference between super soil and live soil is longevity.
Many super soil recipes published over the years, such as Coots Mix and SubCools super soil, are made by layering different amendments at varying horizons. This is an attempt to make a medium that will provide proper nutrition from the vegetative stage through flowering. You only use Super Soil once since it only contains enough nutrition for one cannabis lifecycle.
With living soil, you minimally add amendments to your soil and water with biological inputs, like compost. This adds bacteria and fungi and helps maintain a healthy and balanced ecosystem in your soil mix. This additional work keeps your soil perpetually healthy, while a super soil mix will be barren and used up at the end of a grow.
What is the best medium for living soil?
Living soil for weed is best made with loamy soil and pumice for aeration (oxygen pockets in your soil). The soil texture should be in the middle of fluffy and dense but leaning towards the fluffier side. I like to use pumice instead of perlite in my living soils because it is more environmentally friendly and provides low levels of nutrients such as silica.
Is living soil better for outdoor or indoor?
Living soil works perfectly well for outdoor and indoor cannabis cultivation. However, it is a little easier and more forgiving running plants outdoors in living soil. In an outdoor setting, there is already a variety of microbiology living in your soil that can be used as a jumping-off point. Plants are also much hardier outside and can survive off whatever minerals are available in a good native soil.
In an indoor setting, you have to start from the ground up with living soil since you are starting in a sterile environment. You’ll need to put much more thought into creating your medium, but many soil manufacturers, such as SoHumm Living Soil, provide soils that can be used as a good base.
The downside to living soil for indoor grows is a potentially lower yield due to the inability to aggressively feed (like in a hydroponic system). There’s also low yield due to size constraints. Since indoor spaces are usually smaller, you can’t grow bigger plants to compensate for the smaller yield.
Looking to start your grow in a small space? Check out our guide on growing marijuana in small indoor spaces!
In terms of quality, though, living soil is great both inside and outside just because of the natural availability of nutrients. Whether you grow indoors or outdoors, living soil will create beautiful flowers that smell and taste amazing.
Want to start an outdoor grow? Shop outdoor seeds at ILGM today.

Shop Outdoor Seeds
- Grow plants that thrive outdoors
- Best against mold and pests
- Feminized and autoflower seeds
What is the best pH for Living Soil?
For those not familiar, pH is a measure of how acidic or alkaline something is. Many growers check the pH of the irrigation water and medium religiously, while some may have never checked either. In living soil, pH is not a huge factor if you have proper pH regulators like dolomitic limestone and gypsum to keep your soil pH within range. You should shoot for a pH of 6.5, which is slightly acidic. This pH provides the best availability for nutrient uptake in soil.
Is living soil better than hydroponics?
Living soil is my preferred cultivation method, but that does not necessarily mean it is the best. In my opinion, it produces plants with better aromas and flavors than hydroponics and is much more environmentally friendly compared to using salt-based fertilizers. However, hydroponics provides a system for growing plants faster and with a typically higher yield. I would rather take quality over quantity, but everyone has their own motives.
Is living soil better than coco?
Again, to each their own, I would still choose living soil over cannabis grown in coco. Coco is a good medium but tends to be pretty salty and contaminated with pathogens and heavy metals. Coco provides the benefits of faster plant growth and larger yields and is more forgiving than most hydroponic cultivation methods. However, I would still choose living soil as a better medium.
Is living soil good for autoflowers?
Living soil is a good medium to grow autoflowers because of how nutrients are stored. Living soil lets autoflowers pick and choose the nutrients they need at different life stages. This takes some of the guesswork out of how to nutritionally steer your autoflower since its life cycle is not cut and dry like a photoperiod plant. Keep in mind you would want to create a specific living soil recipe for autoflowers instead of one for photoperiod plants.
Have you found the soil you want to use for your grow? Pair it with ILGM’s autoflowering seeds today!

Buy Autoflower Seeds
- For new and experienced growers
- Easy-growing, low maintenance
- All popular cultivars
How much should I water my cannabis in living soil?
Watering living soil can be a little tricky at first. You should start with clean water and make sure not to let your soil become too dry. Too-dry soil will harm the bacteria and fungal colonies you have worked hard to cultivate (and are working hard for you). When watering inside, you should water until you get some water coming out the bottom of your pot. Keep this runoff to a minimum so you don’t flush out any nutrients your microbiology has not metabolized.
How to make Living Soil?
There are many different living soil recipes to choose from when crafting your soil. I recommend looking at various manufacturers’ recipes for their living soils and breaking them down to create your own, such as Gaia Green, Nature’s Living Soil, and SoHumm Living Soil. Any living soil recipe relies mainly on a good source of compost, so do your due diligence and research good compost sources when choosing your compost for a living soil.
Final Thoughts on Living Soil
Living soil is an excellent medium for cannabis cultivation. It is economical, environmentally friendly, and produces high-quality buds. It is also a fascinating method of cultivation. I find it fun learning and implementing different types of microbiology and natural inputs when growing cannabis.
Living soil is versatile since it can be implemented in an indoor or outdoor garden and is very easy to start compared to other cultivation methods. The quality of the final product speaks for itself. Every grower should do at least one living soil garden in their life just to experience this fantastic growing method.
Keep learning to keep your garden greener, Spenser

What To Call The Illegal Marijuana Market

Pakistan Makes Positive Move On Cannabis

The Dangers and Effects of THC Vape in UK
How to Buy or Sell a Cannabis Business: The Webinar Replay
Alabama Senator Calls State Medical Cannabis Commission A ‘Money Pit’ Amid Ongoing Litigation

Is Thailand about to Change Their Cannabis Laws Yet Again?

Does Lizzo Consume Weed – The Fresh Toast

Do Delta 8 Edibles Work For Female Arousal?

Could You Help Your Lips With CBD Balm

California Awards $12 Million In Local Cannabis Equity Grants To Repair Drug War Harms

Distressed Cannabis Business Takeaways – Canna Law Blog™

United States: Alex Malyshev And Melinda Fellner Discuss The Intersection Of Tax And Cannabis In New Video Series – Part VI: Licensing (Video)

Drug Testing for Marijuana – The Joint Blog

What you Need to Know

Cannabis, alcohol firm SNDL loses CA$372.4 million in 2022

NCIA Write About Their Equity Scholarship Program

City Of Oakland Issues RFP For Employee Training Programs

It has been a wild news week – here’s how CBD and weed can help you relax

A new April 20 cannabis contest includes a $40,000 purse

UArizona launches online cannabis compliance online course
-
 Cannabis News1 year ago
Distressed Cannabis Business Takeaways – Canna Law Blog™
-
 One-Hit Wonders1 year ago
United States: Alex Malyshev And Melinda Fellner Discuss The Intersection Of Tax And Cannabis In New Video Series – Part VI: Licensing (Video)
-
 drug testing5 months ago
Drug Testing for Marijuana – The Joint Blog
-
 Cannabis 1011 year ago
What you Need to Know
-
 Marijuana Business Daily1 year ago
Cannabis, alcohol firm SNDL loses CA$372.4 million in 2022
-
 Education1 year ago
NCIA Write About Their Equity Scholarship Program
-
 Education1 year ago
City Of Oakland Issues RFP For Employee Training Programs
-
 Cannabis1 year ago
It has been a wild news week – here’s how CBD and weed can help you relax