

Grow Lights
Choose the Best Timer for Your Grow Lights
One of the unsung heroes of the indoor grow room is the timer controlling your lights. Without a timer for grow lights, the responsibility of turning grow lights on and off falls on the grower. As diligent as we may think we are, grow light timers are far more consistent and reliable.
Automating your grow lights is convenient; the grower is free from wondering whether they turned the light on or off. A plant light timer can also save you energy. Plant light timers can even lengthen the life of your lighting system. Maintaining a regular light cycle also prevents plant stress that can lead to undesirable traits like hermaphroditism.
The lifecycle of a cannabis plant is often longer than 90 days; that’s over 180 times of manually turning on and off your light without fail at a set time. That’s nearly impossible, as anyone who has tried to do it will tell you. You can now see why a grow light timer is necessary for indoor growers. This buyer’s guide for grow light timers will help you choose the best timer to make your indoor gardening life easier.
What to look for when buying a grow light timer
First, you must know how many devices need a timer. Most timers will have two outlets to plug in devices. But what if you need a timer for two lights and a dehumidifier? How about power strips with grow light timers built in?
There are a few options to choose from. Some models will have two rows of outlets, one timer controlled and the other side active 24/7. Commercial growers can use professional devices like zone controllers to control multiple light schedules from one main hub.
Once you have identified the devices you’ll need to connect to your grow timer, add up the wattage of the devices. Can this timer handle that much load? It is crucial to confirm your weed timer will be able to adequately supply the lights with the right power.

Safety is your number one concern with grow light timers
Safety is #1 when it comes to indoor gardening. As a rule of thumb, buying a timer with plenty of headroom is better than one with a maximum wattage close to your devices’ combined maximum wattage. Wattage = amps x voltage. Check the amps on your circuit breaker in the house to ensure it can handle the electrical load.
Note: In the US, which uses 120v plugs, 1 amp = 120W. In this scenario, 10 amps = 1200W. In many European countries, the standard plug is 220v. In those countries, 1 amp = 220W. Using the same math, 5 amps = 1100W.
We cannot stress safely setting up your lights enough. Be sure to check our free Grow Bible for safety tips and to maximize your grow!
Analog timers
Analog timers are a bit old-school by today’s standards; however, various analog timer styles are still available. Some are spring-loaded, others involve placing pins in the on/off positions, and some function by depressing tabs. These devices do the job, but there is more room for error in using dials or pins to control timing compared to a digital display found on current 24-hour light timers.
Verdict: They work, but there are better, more reliable options at affordable prices.

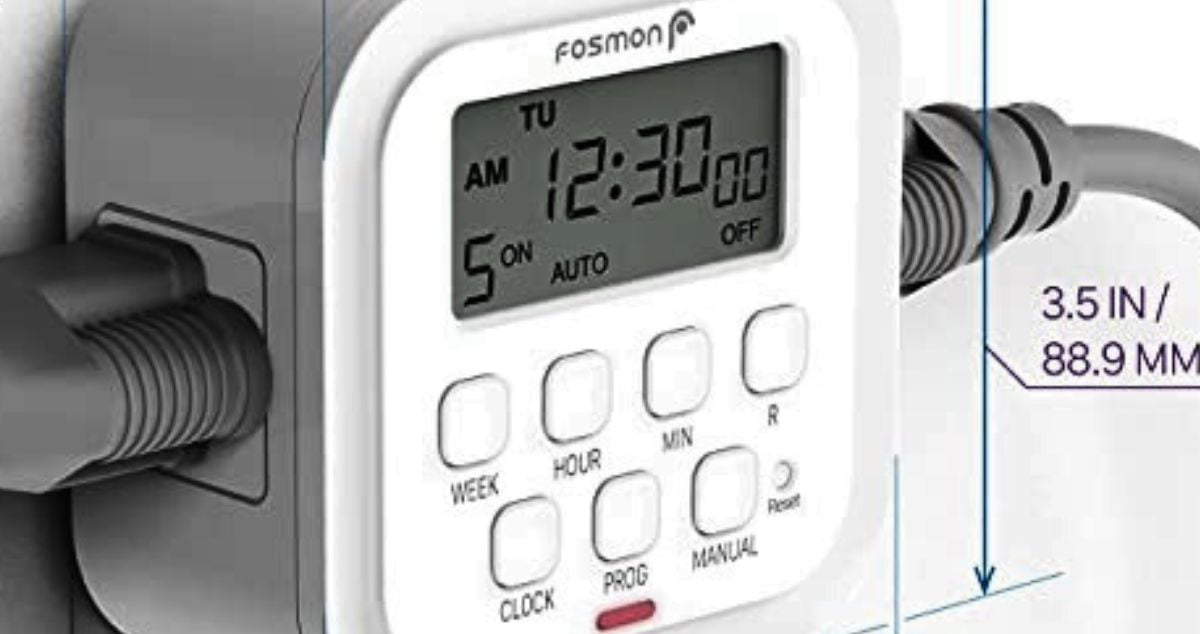
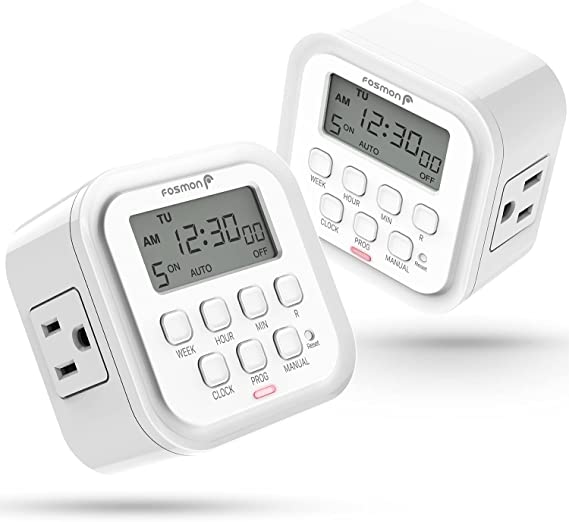
Digital timers
The functionality of digital grow light timers far surpass what the analog models are capable of. These light timers come with an LED display, which makes setting the correct times less worrisome. Just be sure to look for the am/pm symbol to ensure the lights go on and off when you want them to. A digital timer for grow lights often comes with the ability to set several different lighting schedules as well.
Verdict: An excellent solution for automating your grow light schedule. This is the most widely used type of timer for plants.
WiFi timers
These types of timers are becoming more common in the market as companies move to integrate all of their devices in the grow room. WiFi timers are often a feature of app-based grow room systems. Growers can schedule their on / off cycles just like they would with a digital timer, but they get real-time feedback about garden conditions, including illumination, on their phones.
Verdict: Cool new system for controlling and monitoring grow room environment and functionality through your phone. Some people have privacy/data concerns in some regions of the world.

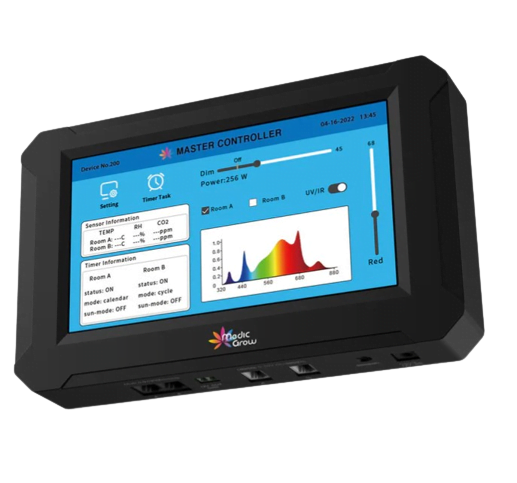
Grow light controllers
For commercial applications, growers need industrial-ready lighting controllers. These units will often come with a minimum of eight outlets. They are specifically designed to handle higher wattage loads. Many of these units allow growers to program different lighting schedules for the different outlets. This allows one unit to control the light schedules in separate zones.
Verdict: This would be overkill in a tent. These units are also the most expensive. However, if growing commercially, this is a necessary piece of equipment.
LED grow lights with integrated timers
This may become more common in the future; however, lighting companies that are focused on the hobby grower have yet to incorporate this feature into their units. Many of these companies opt instead to build a WiFi-capable timer that resides in their special controller and is accessed via an app.
Verdict: Too soon to tell if we will see an LED grow light with a built-in timer become a standard feature. Many other devices can control light schedules, and lighting companies are reluctant to add a feature that can become a failure point.
Whether you are using LED, high-pressure sodium (HPS), or compact fluorescent light (CFL), the best electrical timer will have enough outlets to handle your specific wattage load. The amount of money you will spend on one of these devices depends on size and features.

What should a good timer cost?
Fortunately for home growers, good light timers don’t cost much. Most basic analog or digital two-outlet timers range from $10 to $30. You will get the most value for your dollar from a digital grow light timer compared to an analog one.
Avoid the cheapest options because the function is most important. Many similar options are available at the same price; choosing the best grow light timer comes down to your preference. Look at the reviews of each product before making your purchase, and make sure your light timer of choice meets the criteria outlined above.
Here are nine of the best “budget” timers for grow lights used by cultivators in the community.
Budget-friendly grow light timers
Analog
Digital
Power strip models
Timer prices will rise as the number of outlets increases and wireless connectivity expands. The above models are all UL certified and can safely accommodate a 1000W light with plenty of capacity remaining. These grow room timers make lighting schedules versatile and customizable; just set and go.
Pro tips when using grow light timers
I always like to test my LED grow light timer a few times before installing it in the garden. I do this by attaching it to a lamp in the room and setting the time to go on in 2 minutes and then off again in another 2 minutes. I will repeat this a few times to gain confidence. I will then set the timer to the desired schedule and leave the lamp attached for a few days. Is the light coming on when it shouldn’t?
In almost every case, no, the lamp did not turn on when I wasn’t expecting it. Most digital timers have a “random” or “vacation” mode that turns lights on or off at different times throughout the day, regardless of the timer setting.
Ensure those options are not selected if your new timer has this feature. Random and vacation modes tend to be the features that can trip people up and cause problems in the grow room. Always be sure to read the directions to set your grow timers accurately.

Shop Indoor Seeds
- Indoor-thriving plants
- For windowsill or under lamps
- Feminized and autoflowers seeds
Do you need a light controller for LED grow lights?
You do not need an advanced controller; a basic timer will work. However, advanced controllers can expand the options of what you can do with your light, e.g. change intensity, mimic sunrise and sundown, or turn on/off remotely.
Are expensive timers worth it?
Never be shy to use quality equipment in your grow room, but higher prices usually equate to more features. The average hobby grower does not need many of these features. As your grow expands and the number of lights increases, investing in more complex grow light timers can be a benefit.
If you’re looking to save a buck or two, be sure to sign up for notifications. We’ll ping you whenever our premium cannabis seeds go on sale!
Can you use a power strip with grow light timers? Is that wise?
It will always be best to connect your cannabis grow light timer directly to a wall socket. The higher-wattage drawing devices in my tent are connected directly to an outlet. If you are connecting a light timer to a power strip, make sure the power strip has a surge protector. A better solution would be to buy a power strip/surge protector with a timer built into it, like in the examples above.
Now that we’ve covered grow light timers, it’s time to learn more about grow lights. Read our articles on the best marijuana grow lights and maintaining optimal lighting for cannabis plants to expand your knowledge base. That’s a great part about indoor gardening; there is always room to learn more.
Still have questions? Let us know in the comments, and please let us know which style of timer you are using. Are you analog, digital, or trying the new app-based approach to grow room control? We want to know!
Be sure to download Robert’s 70-page Grow Bible for free to learn everything about setting up your grow room perfectly!
Happy growing!
aeroponic system
Exploring Different Hydroponic Systems for Indoor Weed Cultivation » How to Grow Weed Indoors
Hydroponic systems have revolutionized indoor gardening, providing enthusiasts with efficient and effective methods for cultivating various plants, including cannabis, thus Exploring Different Hydroponic Systems for Indoor Weed Cultivation is important.
With the increasing interest in indoor weed cultivation, growers are exploring different hydroponic setups to maximize yields and quality. In this article, we delve into the world of hydroponics, exploring various systems tailored for indoor cannabis cultivation.

Understanding Hydroponic Systems
Hydroponics is a soilless cultivation technique that delivers nutrients directly to plant roots through water. This method offers several advantages over traditional soil-based gardening, including better control over nutrient uptake, faster growth rates, and higher yields. For indoor weed cultivation, hydroponic systems are favored for their versatility and ability to optimize growing conditions.
Types of Hydroponic Systems
- Deep Water Culture (DWC) System:
The DWC system is one of the simplest hydroponic setups, consisting of a reservoir filled with nutrient-rich water where plant roots are submerged. Oxygen is supplied to the roots through air stones or pumps, ensuring adequate aeration. DWC systems are popular among cannabis growers for their ease of setup and low maintenance requirements. -
Nutrient Film Technique (NFT) System:
In NFT systems, a thin film of nutrient solution continuously flows over the plant roots, providing a constant supply of water and nutrients. This system utilizes a sloping channel where plants are placed, allowing gravity to facilitate nutrient flow. NFT systems are ideal for cannabis cultivation due to their efficient use of water and nutrients. -
Ebb and Flow (Flood and Drain) System:
Ebb and flow systems consist of a tray or table filled with a growing medium such as clay pellets or rockwool. Periodically, the tray is flooded with nutrient solution from a reservoir, which is then drained away, providing oxygen to the roots. This cyclic flooding mimics natural irrigation patterns, promoting healthy root development and nutrient absorption. -
Aeroponic System:
Aeroponic systems suspend plant roots in the air, allowing them to be periodically misted with nutrient solution. This setup promotes rapid nutrient absorption and encourages robust root growth. Aeroponic systems are highly efficient in water usage and are favored by growers seeking maximum yields in limited space.
Factors to Consider When Choosing a Hydroponic System
- Space: Consider the available space for your indoor grow operation. Compact systems like DWC or aeroponics are suitable for smaller spaces, while larger setups like ebb and flow systems may require more room.
-
Budget: Evaluate the cost of equipment, including reservoirs, pumps, grow lights, and nutrient solutions. Choose a system that aligns with your budget and offers long-term value in terms of yields and efficiency.
-
Skill Level: Some hydroponic systems require more technical expertise to set up and maintain. Beginners may prefer simpler setups like DWC, while experienced growers might opt for more advanced systems like NFT or aeroponics.
-
Nutrient Management: Different hydroponic systems may require specific nutrient formulations and pH levels. Ensure you have a good understanding of nutrient requirements for cannabis cultivation and can effectively manage nutrient solutions.
Optimizing Indoor Weed Cultivation with Hydroponics
- Lighting: In addition to choosing the right hydroponic system, selecting appropriate grow lights is crucial for indoor cannabis cultivation. LED grow lights are popular for their energy efficiency and customizable spectrum, providing optimal light conditions for plant growth and flowering.
-
Nutrient Solutions: Invest in high-quality nutrient solutions formulated for cannabis cultivation. Pay attention to nutrient ratios and adjust accordingly based on plant growth stages. Regularly monitor pH levels to ensure nutrient uptake efficiency and prevent nutrient deficiencies or toxicities.
-
Environmental Control: Maintain ideal environmental conditions, including temperature, humidity, and airflow, to promote healthy plant growth and minimize pest and disease risks. Utilize fans, ventilation systems, and climate control devices to create a stable growing environment.
-
Monitoring and Maintenance: Regularly monitor plant health, growth progress, and system parameters such as nutrient levels and pH. Conduct routine maintenance tasks such as cleaning reservoirs, replacing nutrient solutions, and inspecting equipment for signs of wear or malfunction.
Conclusion
Hydroponic systems offer cannabis growers a versatile and efficient method for indoor cultivation, allowing for precise control over growing conditions and maximizing yields. By exploring different hydroponic setups such as DWC, NFT, ebb and flow, and aeroponics, growers can find the perfect system to suit their space, budget, and skill level. Coupled with proper lighting, nutrient management, and environmental control, hydroponics can optimize indoor weed cultivation, resulting in healthy plants and high-quality yields. Experiment with different hydroponic systems to discover the best approach for your indoor cannabis garden.

What To Call The Illegal Marijuana Market

Pakistan Makes Positive Move On Cannabis

The Dangers and Effects of THC Vape in UK
How to Buy or Sell a Cannabis Business: The Webinar Replay
Alabama Senator Calls State Medical Cannabis Commission A ‘Money Pit’ Amid Ongoing Litigation

Is Thailand about to Change Their Cannabis Laws Yet Again?

Does Lizzo Consume Weed – The Fresh Toast

Do Delta 8 Edibles Work For Female Arousal?

Could You Help Your Lips With CBD Balm

California Awards $12 Million In Local Cannabis Equity Grants To Repair Drug War Harms

Distressed Cannabis Business Takeaways – Canna Law Blog™

United States: Alex Malyshev And Melinda Fellner Discuss The Intersection Of Tax And Cannabis In New Video Series – Part VI: Licensing (Video)

Drug Testing for Marijuana – The Joint Blog

What you Need to Know

Cannabis, alcohol firm SNDL loses CA$372.4 million in 2022

NCIA Write About Their Equity Scholarship Program

City Of Oakland Issues RFP For Employee Training Programs

It has been a wild news week – here’s how CBD and weed can help you relax

A new April 20 cannabis contest includes a $40,000 purse

UArizona launches online cannabis compliance online course
-
 Cannabis News1 year ago
Distressed Cannabis Business Takeaways – Canna Law Blog™
-
 One-Hit Wonders1 year ago
United States: Alex Malyshev And Melinda Fellner Discuss The Intersection Of Tax And Cannabis In New Video Series – Part VI: Licensing (Video)
-
 drug testing5 months ago
Drug Testing for Marijuana – The Joint Blog
-
 Cannabis 1011 year ago
What you Need to Know
-
 Marijuana Business Daily1 year ago
Cannabis, alcohol firm SNDL loses CA$372.4 million in 2022
-
 Education1 year ago
NCIA Write About Their Equity Scholarship Program
-
 Education1 year ago
City Of Oakland Issues RFP For Employee Training Programs
-
 Cannabis1 year ago
It has been a wild news week – here’s how CBD and weed can help you relax