

Growing Indoors
How to Grow Weed on your Windowsill
Cannabis has been grown in many climates, environments, and places, including the most common place beginners start- a window sill. While a window sill might not provide ideal conditions, it does let you dip your feet in the water of cannabis cultivation. It can be very fun for the new cultivator trying to grow weed for the first time and a great experience for future gardens.
Are you ready to grow weed but don’t think you have the space? You can also enjoy greener pastures by learning the ins and outs of growing cannabis on your window sill!
Things to consider when looking for a spot to start a window grow
Growing on a window sill is definitely not the best place when growing cannabis. However, for a beginner who does not want to invest a lot of money in infrastructure to start an indoor garden or have space outside to grow their own marijuana plants, a window sill is a great place to start. When growing on a window sill, there are a few things to consider, such as the temperature by the window. However, the biggest factor is lighting, or better yet, the lack thereof. But there are other factors to consider as well:
- Light: You will want to pick a window that gets good direct sunlight for the majority of the day, preferably southern facing, for optimal light intensity.
- Size of the window: The biggest factor that people need to consider is the size of the window sill. Cannabis plants can get rather large, so you’ll want a window that could accommodate a possibly large plant.
- Concealment: privacy is another factor, meaning that neighbors aren’t able to see your beautiful weed plant and possibly cause issues with your housing situation.
- Temperature: Having a window in a room that stays cool in summer and warm in winter is another factor you’ll want to consider. Finally, a window that’s close to a water source, such as your kitchen or bathroom, will also make watering your plants easier.
The pros and cons of growing in your window
Indoor-grown weed produces top-quality cannabis if done well. However, I don’t want to get your hopes up; weed on a windowsill will likely produce mid-grade flower since conditions aren’t extremely dialed in like in a million-dollar indoor room.
But, windowsill weed growing will produce flower you can be proud of since you did it yourself. For me, that in itself is more rewarding than anything else! Growing plants in your house also help clean the air you breathe and can create a source of responsibility and joy that can also improve other aspects of your life as well!
| Pros | Cons |
|---|---|
| Easy to start | Harder to control the environment |
| Low cost to start | Lower yield than other methods |
| Can improve your mood | Lower quality than other methods |
| Super fun to do! | Can be an inconvenience |
What you need to grow on a window sill
You will need a few things to get started growing cannabis indoors on a window sill. First, you will want pots and soil. A medium-sized windowsill pot of around 1-3 gallons is large enough to support a decent-sized plant but can still be easily moved if needed.
It’s best to use soil over other mediums, such as rockwool or coco, since it is more forgiving for beginners and requires less complex care. A nutrient-dense soil such as premade super soil makes your plants easier to care for and eliminates the need for other types of fertilizer. You will also want a saucer or plate that catches any water running out the bottom of your pot when watering to prevent spilling all over your floor.
If you want to learn how to properly grow marijuana plants on a window sill, check out our Grow Bible by Robert Bergman!
The best cannabis plants for your window grow
In my experience, the best type of cannabis plant to grow on a window sill is an autoflowering variety. Autos work great for windows because they are usually shorter in height and eliminate the need to control the lighting. Most cannabis plants are photoperiod dependent, meaning they require a shorter light period to enter their flowering stage. Traditionally a 12 hours of light and 12 hours of darkness schedule is used inside to flower cannabis plants, and anything over 18 hours of light will keep plants in the vegetative stage of growth, whether it be natural light coming from the window or artificial light from inside your home.
Autoflowering strains do not require a change in photoperiod to initiate their flowering phase, so you will not have to worry about moving your plant to a dark space to flower it or wait an extended period of time for your plants to go through its flowering cycle to harvest them. If you are growing photoperiod plants, they can easily be forced to flower by moving them to a closet at night.

Shop Indoor Seeds
- Indoor-thriving plants
- For windowsill or under lamps
- Feminized and autoflowers seeds
When to grow on a window sill
Anytime is a good time to grow cannabis on your window sill! The easiest time to get plants going, though, is in Spring when temperatures begin to rise, and the light from the sun becomes more intense. This gives you plenty of time to grow your plants if you plan to let them naturally go through their flowering cycle and gives you the most optimal environmental conditions.
In winter, you must consider that having your plant close to your window will create a cold environment. The sun is also less intense in winter, so expect less vigorous growth and lower yield than your summer crops.
When growing photoperiod plants, you’ll also have to keep a light on in your room to keep the photoperiod plants from flowering too early.
How to grow weed on a window sill
- Step 1: Gather all your needed supplies to start your garden, including pots, soil, and saucers
- Step 2: Either germinate your cannabis seeds (check out our seed selection!) or buy clones to get your garden started
- Step 3: Transplant your starts into a pot of soil
- Step 4: Watch your plant grow and prune branches and pull leaves as needed
- Step 5: Start forcing your plant to flower by moving it to a dark location, or if you’re growing autos, then let them keep their course
- Step 6: When the flowers look done, harvest and dry your plants
- Step 7: Cure and trim your flowers
- Step 8: Enjoy!
Final thoughts
Growing cannabis is greatly rewarding, and there’s no time like the present to start cultivating this great plant. Just remember, you don’t need a fancy grow room or lots of space outside to start growing cannabis plants; many people begin on their window sill. You can make it as simple or as complex as you would like, but your main goal should be to have fun with it.
When you’re ready, explore and learn how to cultivate cannabis correctly. You can learn a lot about growing cannabis, even on a small scale on a window sill. If you need any additional knowledge to get you started on your cannabis cultivation journey, check out Robert Bergmans free Grow Bible!
Keep learning to keep your garden greener
Spenser
The art of discretion as an indoor grower is based on sight, smell, and sound. If these three factors are well covered, you should never need to worry about an unexpected knock on the door or for any neighbors to ever suspect you of being a green-fingered enthusiast. In this article, I explain all you need to know about how to soundproof your grow room or grow tent, why you should soundproof in the first place, how to make a DIY muffler at home, and above all, my top tips for a silent grow location.
Why should I soundproof my grow room or tent?
Well, why not? Running a quietly operated indoor grow room is not only pleasant for your own sake; it will also remove any concerns that a close-by neighbor may become aware of what is happening one wall away.
The amount of noise you create is like an audio footprint that needs to be well-considered. Not only will soundproofing your grow tent, converted room, attic, or basement make life easy, it will also keep away the unwanted presence of police or thieves.
What are the noisiest parts of my grow room and tent?
Exhaust fans, oscillating fans, wall fans, and hydroponic pumps will be your main source of noise. Sometimes, it can be difficult to reduce the noise levels of industrial-powered fans, especially large-sized ones with the capacity to remove up to 1300+m3/h- those will produce 45–55 decibels of sound.

The sound of air passing through ducting is also one of the main culprits of a noisy grow space. As a first-time grower, you may plug in all your equipment and be overwhelmed by the noise output. I remember the first time I set up my extraction at home while living with my parents. It was so loud you could hear it while watching TV downstairs, which bothered them deeply.
9-12 inch fans at full speed can also become noisy, especially if clipped to tent poles or sat directly on the floor. You would be surprised at the difference mounting a fan correctly can make inside a tent or grow room wall. The other main source of noise you may encounter if working with hydroponics is the required aquarium pumps and air pumps

Once plugged, air pumps will make a loud and clear humming sound close to the 50-decibel mark. Not only will air pumps be switched on 24 hours a day, they may become louder over time until they need replacing. This can also be the case with water pumps, which circulate nutrient solution back to the reservoir.

Ready to learn more about building the perfect grow room? Please sign up for our Grow Bible below and learn all the tips and tricks from Robert Bergman himself!
How to soundproof my indoor cannabis garden
The extent of how much time, effort, and money you invest in soundproofing your grow room will be based on budget, space, and experience. Below are some of my personal favorite ways to help you significantly reduce the amount of noise pollution to consider.
1. Passive cooling grow lights

In recent years, passive-cooled technology using heat sink designs has allowed horticultural grow lights to operate in silence. Unlike some older LED lights with noisy internal fans prone to dust and breaking down, passive-cooled lights mean operating a discreet and quiet grow room as far as lighting is concerned.
The benefits of passive cooling lights
There is no need to be concerned about internal fans malfunctioning, which is what t I enjoy about using passive-cooled lighting. When the internal fan of a grow light stops working or begins to lose power substantially, you can be left jeopardized, causing a temperature and humidity fluctuation.
Avoid these mistakes
- Spending your hard-earned money on cheap LED lights.
- Low PAR levels; they’ll only produce small yields, so do your research.
- Forgetting that high-powered LED lights may not be the most cost-effective.
- Choosing old designs with a small output of light and outdated tech.
2. Acoustic ducting

Traditional aluminum ducting is cheap and cheerful, but if you are prepared to invest in acoustic ducting, you can significantly reduce noise levels. I always use acoustic ducting attached to silencers and find this is the most silent and discreet way to transport high volumes of air. The cost of acoustic ducting compared to standard aluminum can be 2–3 times the cost; however, it is well worth the investment over time.
The benefits of acoustic ducting
Using acoustic ducting can take the edge off, allowing your room to exhaust air in a quiet and discreet fashion. However, it is worth knowing that acoustic ducting can be expensive. When installing in a large-sized room, your costs may rapidly increase.
Avoid these mistakes
- Allowing the ducting to droop when you are hanging the equipment.
- Installing without a face mask for protection from asbestos.
- Handling the ducting with skin exposed. This can cause irritation.
- Attaching the ducting with a loose fitting, causing air to escape.
3. Silencers

In my opinion, silencers are one of the most effective means of controlling noise levels. They act as a muffler, allowing air to pass without losing power or efficiency. I always like to use two silencers and connect one on either side of the extractor. You will be amazed at the difference.
The benefits of silencers
Silencers are one of my personal favorite additions to any indoor secret garden. They are lightweight, solid in design, and will last for years. You can easily attach them to ducting, and when using two, you will find the noise levels will drop to a level all the members of your house will be happy with.
Avoid these mistakes
- Overcrowding inside small-sized tents when installing silencers.
- Installing too few. Using one works well, but spend the extra money and buy two.
- Incorrect fir. Make sure that the silencer has an airtight, secure fit.
4. Plug dimmers

These simple but highly effective devices act by connecting to the plug socket then allowing you to change the power output. Turning a dial left or right allows airflow and noise to be lowered at will. Plug dimmers work like a charm when using large-sized extractors or for those who sleep in the same room as their tent or stealth grow box.
I recommend never lowering the dial below 25%, as this can cause some ventilation systems to switch off or produce such little output it is not worth it doing. Plug dimmers are a wonderful tool for a visiting landlord, bedtime, and finding the sweet spot that works for you while providing adequate levels of exhausted air.
The benefits of plug dimmers
Plug dimmers are an excellent way to reduce noise levels and the amount of power received, thus reducing electricity bills. One thing I love about these cheap and highly effective devices is their versatility. They can also be used on house lamps to lower lighting.
5. Using T.T. fans

RVK fans are the large-sized round extractor fan that is most commonly used when growing cannabis indoors. The only issue with RVK fans is the fan’s noise when spinning at full power and the noise from the air being produced. T.T. fans are smaller extractors that can serve the purpose of a small-sized stealth grow box and are far quieter than the RVK model.
The benefits of T.T. fans
Growers operating a stealth grow box will benefit the most from T.T. fans. These small-sized fans are light, easy to hang, and make little noise when on full power running 24 hours a day.
Avoid these mistakes
- Wiring the T.T. fans wrong and causing a blown fuse (easily done).
- Buying low-powered commercial bathroom exhaust fans.
- Having short plug wires. Make sure your plug wire is at least 2 meters.
- Not replacing the T.T. fan after every second harvest.
6. Acoustic wooden boxes

You may have seen these in your local grow shop or online and thought, what is that? These wooden boxes with soundproof foam lining are designed to house an RVK fan and eliminate the noise produced by the moving parts. When connected to a plug dimmer, acoustic wooden boxes can really pay off big time.
The benefits of acoustic wooden boxes
What I like about acoustic wooden boxes is that they allow you to sit the box firmly on the floor. This means you can connect the ducting from the box through the top of the tent, giving you plenty of space inside the tent.
Avoid these mistakes
- Hanging the heavy wooden box inside the tent using chains and metal hooks.
- Making a poor-quality homemade version that lacks efficiency.
7. Silent operating hydroponics
One way to grow the biggest yields possible and operate a silent grow room is to use certain hydroponic systems that do not use loud air pumps like DWC. Dripper systems with hydroton and NFT tables with a pump left on 24 hours a day are both great ways to produce minimal noise while maximizing your grow space. This is because NFT water pumps run quietly, use a small flow of water, and only make a dripping sound. Dripper systems can run 24 hours a day (with 100% hydroton) or in 15-minute segments, again only producing a little noise when operating.
The benefits of silent operating hydroponics
I recommend using hydroponics once you have a few grows under your belt and are familiar with the plant, feeding schedules, pH, and E.C. maintenance. Once you get the hydro bug, you never look back, and it can quickly develop into a passionate hobby, as it did with me! The main benefits are yield, short vegetative times, and a clean grow room.
Avoid these mistakes
- Loud air pumps can be a nightmare, especially if sleeping in the same room.
- Vibrating water pumps will shake floorboards and cause reverberation.
- Large reservoir systems can use much more nutrients and take up more space.
- Only using one air stone; instead, use extra air stones to avoid pressure buildup.
8. Electronically commutated fans (E.C.)
In the same way LED lighting changed indoor growing, E.C. fans have also become the preferred choice for the experienced grower. For these, an exhaust fan designed to convert A.C current into direct current (D.C) works with a silent brushless motor. These high-priced exhaust fans have adjustable speeds, produce little noise, and are energy efficient compared to RVK fans.
The benefits of E.C. fans
These fans may set you back in the financial department; however, after buying my first-ever E.C. fan, I cannot recommend them enough. You can adjust the power using a dimmer with most E.C. fans, allowing you to operate a silent room.
Avoid these mistakes
- Focusing on a good deal only and going with a non-reputable, cheap brand.
- Not checking the amount of air per hour they can exhaust.
- Hanging inside without assistance, E.C. fans can be quite heavy.
Grow room specific soundproofing considerations
Sound-absorbing materials are an excellent way to convert a spare room, old cellar, or basement to a warm, temperature-controlled environment. Not only will they act as an insulator, they also reduce reverberation and noise. Below are some precautions to consider while planning for your next indoor space.
Weatherstripping tapes on doors & windows
- This is especially important to prevent light breaks and ensure an airtight seal.
- Easy to apply, and for the extra small cost, it is well worth it.
Padding dry walls
- Sound will become muffled through padded walls.
- Using acoustic foam ducting or asbestos foam works well.
- Padding will also help prevent cold spots and moisture build-up.
How to Make a DIY Exhaust Muffler
The easiest way to make a homemade muffler is to use a deep water culture 20-liter bucket. You will need to source the following materials before starting; however, you’ll end up with a very simple and highly effective end product. This example is based on a 6-inch ducting; however, you can use up to 4-10-inch ducting (100-250mm)
Materials
– Acoustic foam (music studio quality)
– 20-liter bucket
– Aluminum ducting
– Acoustic adhesive foam
– Drill with a 6-inch hole saw drill bit
Step 1:
Measure a circle that is 6 inches in diameter. You will want to make a hole at the bucket’s base so the ducting can easily and firmly fit inside.
Step 2:
Using your acoustic foam, measure out the exact length so you can line the wall of the bucket. There should be a snug fit, ensuring that no plastic is exposed.
Step 3:
Once you are happy with the amount of foam, wear a face mask and gloves before spraying the acoustic adhesive foam. In my opinion, this is the best type of glue on the market for this job.
Step 4:
Now drill a 6-inch clean cut through the bucket and insert the ducting into the base of the bucket. The acoustic foam will absorb the exhausted air and instantly reduce the noise level.
Step 5:
I recommend inserting two hanging hooks in the sides of the bucket to make life easy when hanging horizontally.
Step 6:
Switch on your fan and let the muffler do all the work!
When you have set up your soundproof grow room, it’s time to get the seeds for your grow! You can find a selection of our best seed deals below.
My top tips for operating a stealth and silent grow room
Top tip #1:
Always make sure that the ducting is airtight when installing your indoor ventilation. Use duct tape or metal clips. This will help you achieve a top-quality airtight fitting.
Top tip #2:
Be aware of the noise coming from your house or apartment. This refers to where the air is being blown out and if it can be heard from a close-by neighbor, or worst case, standing in front of your house. Do sound checks and listen for any humming or whirring noises.
Top tip #3:
Be careful when removing the trash and keep nutrient bottles, pots, soil, leaves, and stems out of sight. There is no point in running the world’s quietest grow room and not taking care when it comes to discretion.
Top tip #4
Use foam or rubber mats to sit oscillating fans on top of. The layer of mat between the moving fan and the floor will reduce the amount of reverberation through the floorboards.
My final thoughts
I have invested thousands of dollars in all types of ventilation equipment over my lifetime. I wish I had been aware of many of the points covered in this article beforehand. Operating a near-silent grow room is possible, especially for those currently working with a stealth grow box design.
Avoid cheap equipment that is only destined to fail over time, and always be aware that an old fan, air pump, or water pump can become very noisy and, in some cases, can develop into a nuisance for any indoor grower or neighbor. Make sure your grow tent is always sealed and airtight and all ducting is firmly attached.
Be prepared to invest in making your grow room/tent acoustically sound, and you will always have the ultimate peace of mind as an indoor grower. For those willing, try and build a rapport with your neighbors.
As always, if you want to take your growing skills to the next level, I recommend reading Robert Bergman’s Grow Bible!
Congratulations, you are about to begin your home gardening adventure. There are dozens of considerations to designing a custom grow room, from lighting to location to security, but don’t let that intimidate you. The ILGM family has your back with decades of growing experience in all sorts of garden spaces to help guide you through the process.
If you’re reading this, you’ve likely been looking at the different areas of your house and wondered, how do I convert this into a cannabis grow room?
This article will provide all the information needed to build an indoor cannabis grow room. Regardless of the available size, budget, or location, we’ve got you covered. Growing your own cannabis offers the rewards of saved costs and premium products if done correctly. ILGM wants you to succeed and to have fun doing it, which is why this article exists. Let’s get started!
Growing cannabis in a small space
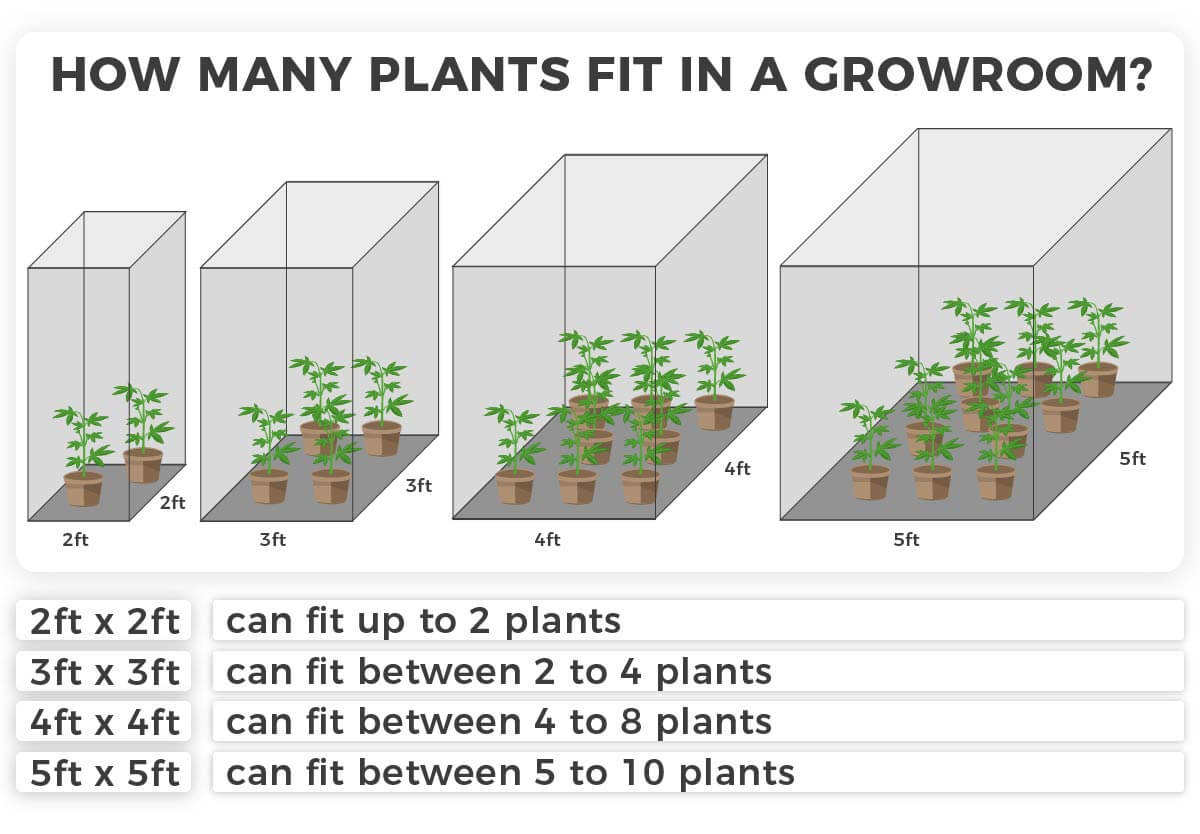
Grow room designs exist for all sorts of footprints. How much space do you need? The best way to choose the ideal size is to determine how many plants you wish to grow. ILGM has hundreds of quality strains; unfortunately, we don’t have enough space to grow them all at once. You can find how many plants fit in different footprints by reading our article: how many plants can you grow in a grow tent?

Let’s say you want to grow a couple of small plants discreetly in an out-of-the-way location or windowsill in your home. Perfect; check out our article on cannabis micro-growing that will walk you through the considerations and steps to growing weed in a small space.
This article, however, highlights grow room designs for converting a larger space into a marijuana grow room.
Choosing the perfect room
Some growers can choose which room is best for them instead of making the only available option work for them. How do you decide? Well, outdoor growers have a saying – work with nature, don’t fight it. If your designs fit naturally into one room instead of another, choose the path of less resistance.
Cannabis plants grow best in the right environment, and temperature is one of those important variables. For example, if you’re deciding between a room with exterior, southwest-facing walls or one without exterior-facing walls, choose the second. It is much easier to keep the room in the middle of the house cooler than one that gets the afternoon sun.
There are a variety of potential grow room locations in your home. Our article – The best places to grow cannabis in a house provides guidance on that topic.
What is the ideal grow room?
The best cannabis grow room plans will utilize a room that growers aren’t afraid to do a little customizing in. Growing cannabis can be messy, although we preach cleanliness. The fact is, there will be soil spilled and water splashed onto the floor.
Rooms with concrete floors are ideal for cleanliness, but most people don’t have concrete floors in the house, only in the garage. You can sweep wood floors, but they can also absorb and retain moisture from spills. Rooms with carpeting can harbor pests and pathogens. Grow tents and drip trays can help mitigate these problems indoors.
Aside from the size, flooring, and location, there are still many things to consider when building a grow room; for instance,
- Normal temperature fluctuations in the room (interior vs. exterior walls / north facing vs. south facing)
- Average humidity in the room
- Do windows need coverings to block light from escaping?
- How many electrical outlets are there, where are they located?
- Where will you exhaust the air?
- Is it accessible to strangers, kids, or pets?
It is advised to have your vision for the grow room design and grow system worked out in your head before beginning construction. How to set up a grow room can be different for different growing styles. Hydroponic growers will need a water source in the room or very close to the room due to the requirements of that growing style.
Soil growers can walk down the hall to fetch water every few days without much inconvenience. Accounting for these small details will help you pick the right room to use. Below, we’ve highlighted the top three places to build a cannabis grow space in a house.
Attic grow room
This is one of the most underused spaces in the entire house. Attics are tucked above the main living areas, which adds discreteness to their potential as a marijuana grow room. Growers can customize this space to suit their needs, and ventilating the used air is as simple as connecting the fan to an existing vent.
Controlling temperatures can be challenging, and if you live in areas with annual snowfall, the bare patch on your roof might give your grow operation away. We go in-depth on the best ways to convert an attic into a cannabis grow room in our article – Attic Grow Room Tips.
Basement grow room
Whether you have an open floorplan or the basement is divided into different rooms, being below ground has advantages and disadvantages. This is another commonly underutilized area of the house that, with a little bit of preparation, can be turned into an excellent marijuana grow room.
The floors are typically concrete, there aren’t many large windows for light to leak from, and basements are a relatively secure area of the home. Extra equipment, e.g., dehumidifiers, may be needed to combat basement moisture, but everything is manageable. You can learn all you need to know about basement grow room plans in our article – Basement grow room tips.
Garage grow room
Another area of the home that, with a little customization, can make an excellent cannabis growing space. Smells, messes, and intense lighting are removed from the main living area, reducing a grower’s stress levels when company visits. Garages are also secured by locking doors, which can be ideal for growers with curious children.
Uninsulated garages will require work to mitigate temperature swings, humidity, and pests; however, they usually have adequate electrical outlets. Breaker boxes are commonly in garages, making installing a new outlet easier if needed. You can find the full list of pros and cons of growing marijuana in a garage in our article – Garage Grow Room Tips.
Equipment needed to build your grow room
For growers who like to make lists of materials and tools, the equipment needed to build a grow room can be divided into two sections: materials for construction and materials for growing. Obviously, you should purchase the materials for constructing your grow room first. However, remember that they both are coming from the same budget. It helps to have the big picture in mind.
If you are converting an existing room inside the house, most of the construction is already finished. My number one suggestion would be to buy a room-sized tent (8ft x 8ft [244cm x 244cm] or 10ft x 12ft [305cm x 366cm] ) or two large tents (4ft x 8ft [122cm x 244cm] ) for growers who want to run a perpetual garden. The large grow tent solution offers a drip tray for spills, reflective walls, and a frame to hang lights and other equipment.
If converting an open room, growers will need
- a stud finder to locate ceiling joists to hang lights
- white paint or mylar to increase the reflectivity of the walls
- floor covering like tarps, linoleum pieces, or large drip containers that hold several pots
- blackout curtains and velcro if the room has windows

Depending on the location and how well the walls are insulated, a few more items may be important. Items for controlling the environment, including
- dehumidifier
- humidifier
- portable Air Conditioning
- portable heater
- circulating fans

To complete the picture, we’ve created an article for cost-conscious consumers titled – How to set up a low-budget grow room. In that article, you will find advice on lighting options, carbon filters, extraction fans, and many smaller accessory items. It also provides important factors for any grow space, such as being lightproof and airtight. But for those who have considered these things and are ready to move on, let’s get started with our design.
Make a grow room design
We shared a link earlier for determining the size footprint needed for the amount of plants that we want to grow. But how much light do we need to cover that space? That answer is in our grow light distance guide. Depending on the number of plants to be grown, you may not need the entire open space.
Gardeners who intend to grow only a few plants may benefit by planning their grow space in one of the corners. A corner placement allows more light to reflect from the walls back onto the plants compared to a few plants placed in the center of the room. You’ll want to access the plants from all sides, so add space for pathways around your plants. If space is tight, you may want to read our article about automatic watering systems for growing marijuana.
An overlooked aspect of grow room design involves electricity. Sharing the electrical load from grow equipment. Items like lighting, air conditioners, heaters, and dehumidifiers can require significant wattage from wall outlets. If a room has multiple outlets, design your plans to have these devices spread out. Consider which devices may be in use at which time. For example, although they both draw significant electricity, your air conditioning and heater are unlikely to run simultaneously. For more information about electricity in a grow room, check out our article – Electrical safety guide for growing marijuana indoors.
How to build your grow room
We’ve selected our room – three walls on the house’s interior and one exterior wall facing the front of the house. All the walls are properly insulated, so there is no need to make major corrections to the room. The full footprint of the room will be used for growing cannabis. Our first move will be to increase the reflectivity of the walls (and thus the efficiency of our light).
This can be done by painting them flat white or covering them with mylar. I prefer using the white paint option for a few specific reasons. The paint cost is lower than the cost to cover the same area using mylar or Panda film. You only need paint, a roller, a tray, some tape, and a tarp. You can also buy white paint with anti-fungal properties blended in; this is recommended.

Mylar and Panda film doesn’t cling to the wall surface; therefore, there are pockets of trapped air between the film and the wall. When there is an extreme temperature differential between the outside and inside of the wall, microclimates and condensation in those small pockets can lead to mold growth. This material is better utilized in smaller areas like micro grows.
Step 1: Wall preparation
Total Time Needed: 1 hour 30 minutes
It’s important to conceal your grow by covering any windows using blackout curtains and velcro. Light leaks and odors are the two most common signals that someone is growing marijuana.
Black curtains that are always closed may raise the suspicion of nosy neighbors. Instead, use blinds or a decorative curtain between the blackout curtain and the glass. This way, when people are looking at the window from outside, it looks just like all of the other windows in the house.
This relatively quick procedure can take up to ten minutes per window. You will need your special curtains, 1.5in (3.81cm) velcro, measuring tape, and scissors.
While the total time takes about 90 minutes in labor, it also needs to dry overnight.
- 01. Tape off any trim around doors, windows, and baseboards (20 minutes)
- 02. Place drop cloths on the floor in the area you are painting to protect the carpet or hardwood floor (5 minutes)
- 03. Stir your paint, pour it into a paint tray, and get your roller fully saturated (5 minutes)
- 04. Paint all four walls; the ceiling is usually already off-white and doesn’t need a fresh coat (50 minutes)
- 05. Allow the paint to dry overnight (ensure proper ventilation and air movement, open the window)
- 06. Remove tape from the trim, window, baseboards, and door (10 minutes)
Step 2: Window(s)
Total Time Needed: 20 minutes
Measuring and hanging your lights when the room is empty is typically easiest. Looking at your grow room design plan, you already know where the lights will be hung. In this design plan, we are hanging two lights spaced at an equal distance from the walls and each other in the center of the room. We’ve calculated the light dimensions and distances; now, we need to drill the holes.
We will need a ladder, a stud finder, a tape measurer, and a pencil to place our marks. To hang the light, we’ll need a drill, eye-bolts or J-bolts, and the chain or yo-yos that will attach our lights to these anchors in the ceiling. For a visual tutorial of these steps, visit our article about hanging grow lights.
- 01. Measure the size of the frame around the outside of the window (2 minutes)
- 02. Cut velcro into four pieces, top, bottom, left, and right (3 minutes)
- 03. Apply one side of the velcro around the window frame and the other side to the blackout curtain (5 minutes)
- 04. Connect the pieces and ensure there are no creases or gaps that can let light escape (3 minutes)
- 05. Turn off all lights in the room for five minutes and then check the velcro area for any leaks (7 minutes)
Step 3: Hang the light(s)
Total Time Needed: 30 minutes
- 01. Locate the joists in the ceiling in the rough position you wish to hang your light(s) using a ladder, stud finder, and pencil (5 minutes)
- 02. Lay your lights on the floor in the intended position, aligned with the newly found joists (2 minutes)
- 03. Stand back and ask – are the lights still centered over the intended garden area? (1 minute)
- 04. Measure the distance between the attachment points on the light fixture (2 minutes)
- 05. Mark that distance on the ceiling, in line with the joists that the light will hang from (5 minutes)
- 06. Use a drill bit with a slightly smaller diameter than the eye-bolt or J-bolt that will be used as an anchor. Drill a pilot hole through the drywall and into the stud for at least 1/2 the length of the anchor (5 minutes)
- 07. Insert the eye-bolt or J-bolt and tighten. Use a screwdriver or long instrument to place through the bolt for additional torque while tightening (5 minutes)
- 08. Use a tape measurer or count the threads to ensure both attachment points are equal distance from the ceiling (2 minutes)
- 09. Attach yo-yos to the anchors, extend them to the floor, and connect the lights (2 minutes)
- 10. Raise the lights to the desired position to verify accuracy, then raise them to the ceiling to get them out of the way for now (1 minute)
Want to read more about how to hang your grow lights in your grow room? Please take a look at our article about how to hang your grow lights here.
Adding ventilation to your grow room
With the lights hung but out of the way, it is time to construct the ventilation for the room. The window in this room faces the street, so that is not an ideal place to vent the air. If your space poses a similar problem, there are a few other options for venting.
The first option would be to seal the room and use a charcoal filter to scrub the air. A downside would be the need for supplemental CO2, which comes with added cost and equipment.

The second option is to cut a 6-inch (15.24cm) vent hole in the ceiling and exhaust the scrubbed air into the attic or out of a roof vent. In any scenario, the exhaust fan should exchange the air once every 1-3 minutes. To calculate the correct fan size for your room, calculate the room’s cubic footage / cubic meter (L x W x H) and select a fan with the appropriate cubic feet/meter per minute (CFM / m3/min) rating.
Exchanging and exhausting the air every 1-3 minutes creates a negative air pressure in the room, which will passively bring in fresh air and CO2 through the cracks in the room door. Long runs of ducting or ducting with numerous bends will decrease the stated CFM, so buy a fan with more power than you think you need.
For this design, we are going with the option of venting out of a roof vent. For this task, we will need our stud finder, tape measurer, bow compass, a jig saw, 6-inch (15.24cm) aluminum duct connector, ducting, worm gear duct clamps, J-bolts, string, carbon filter, and an exhaust fan.
Step 4: Room ventilation
Total Time Needed: 1 hour
- 01. Use the stud finder to find a good place in the ceiling between two joists to make a 6-inch (15.24cm) hole and mark it with a pencil and bow compass (8 minutes)
- 02. Cut the ceiling hole using the jigsaw (use safety glasses for protection) and insert the 6-inch (15.24cm) aluminum duct connector (10 minutes)
- 03. Use the stud finder to find a joist between your lights for mounting the carbon filter and fan (2 minutes)
- 04. Drill the pilot holes and insert your J-bolts (5 minutes)
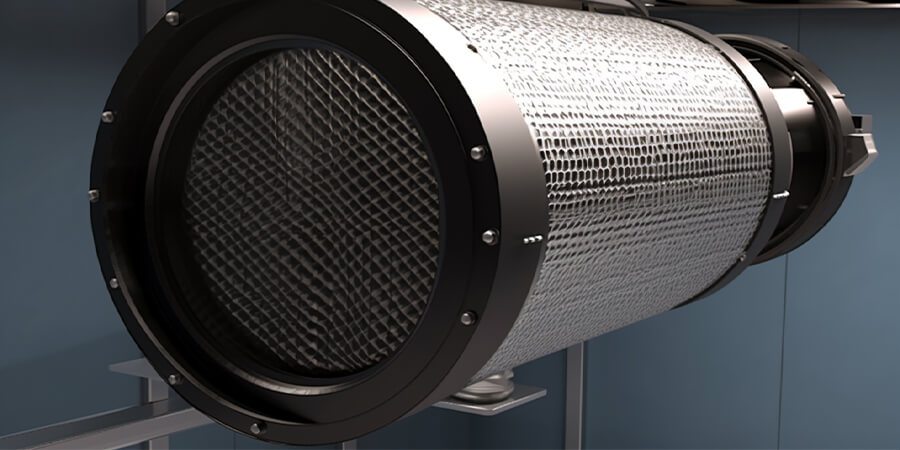
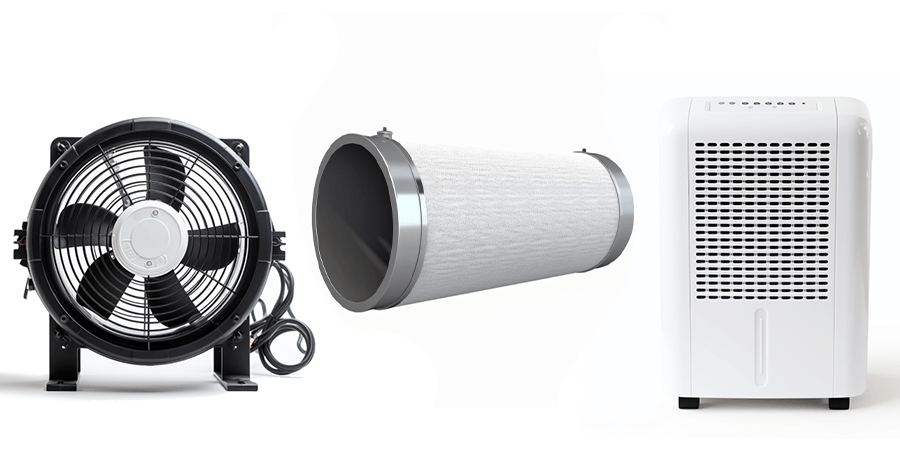
- 05. Hang the carbon filter and fan. Smelly grow room air will be sucked through the carbon filter and exhausted through the ducting into the attic (5 minutes)
- 06. Map the route from the fan exhaust port to the hole in the ceiling. Locate the ceiling joists along that route and place a J-bolt every 3ft (91.5cm). (5 minutes)
- 07. Use string to attach the ducting to the J-bolts in the ceiling along the route running between the output end of the fan to the 6-inch(15.24cm) aluminum duct connector in the ceiling. (10 minutes)
- 08. (Bonus) Go into the attic and attach ducting to the 6-inch (15.24cm) aluminum duct connector popping up through the drywall. Attach this ducting to a roof vent, and now all of the cleaned air is released into the atmosphere for further dissipation (15 minutes)
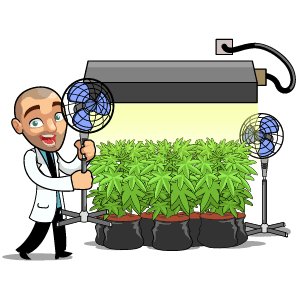
Setting up fans
Moving air within the grow space is also essential to grow room design. Air movement is crucial to reduce micro-climates within the canopy, areas of stale moist air in the corners, and to strengthen branches so that they can support heavier buds. One of the well-known reasons to move air around the grow space is to reduce the opportunities for powdery mildew (PM) to land and grow on your plants.

Place circulating fans on small stands, mounted to the walls or on the floor. At a minimum, you’ll want one fan moving air at the canopy level and another fan moving air below the canopy.
If you have a large room, fans may need to be placed on both sides of the room to ensure the middle section is getting good air movement. For a deeper understanding of the mechanics behind this and why good airflow is important, check out our article on Managing Airflow.
Step 5: Room circulation
Total Time Needed: 10 minutes
Remember to move air both above and below the canopy.
- . Place a fan in the corner (fans mounted to walls will create vibrations and low-frequency noise. This is not ideal if you have neighbors on the other side of that wall) and turn it on to a normal speed. Walk away from it; how far does the air push? (4 minutes)
- 02. Set up a fan on the opposite side of the room and turn it on. Do the two create enough air movement in the center? (4 minutes)
- 03. If satisfied, set the fans to oscillating and ensure that their spread is enough to reach the corners of the room (2 minutes)
Controlling temperature and humidity in your grow room
An advantage of using a room inside a house is that the temperature will generally be in an acceptable zone. There may be the need for cooling in the summer and a little added warmth in the winter, but for the most part, temperatures are controlled already. Most houses, however, don’t have features built-in to control humidity.
Small dehumidifiers meant for tents, RVs, and closets will not impact the humidity levels in a large room full of transpiring cannabis plants. Growers will need to invest in the 30 or 50-pint dehumidifiers. Conversely, humidifiers should have a large enough reservoir that they don’t require filling every few hours. Learn more of these important details in our article – Create the best climate for marijuana grow room.
Step 6: Climate control
Total Time Needed: 10 minutes
Because these devices draw significant wattage from the wall, avoid using them on the same outlet as the grow light if possible.
- 01. Determine the square footage (square meter) of your room by multiplying the length x width (2 minutes)
- 02. Select a dehumidifier and/or humidifier that exceeds the square footage (square meter) of the room, preferably doubled (8 minutes)
Safety and fire prevention
- The first rule in grow room safety is to have multiple smoke detectors in the garden space. I prefer one close to the lights and another near the canopy level.
- A licensed professional should conduct any and ALL electrical work. Never “wing it” with electricity.
- Do not place power strips or electrical connections on the ground where water can be spilled onto them; keep them elevated.
- If you have to use extension cords, the shorter, the better; don’t leave large coils of extension cords around.
- Keep any flammable materials away from the grow lights. This includes curtains, cords, and vegetation.
- Always keep a fresh fire extinguisher at the entrance of the indoor grow room.
- Use tape or twist-ties to secure loose cords to reduce tripping hazards.
Cleaning your grow room
“An ounce of prevention is worth a pound of cure,” goes the saying. It essentially means it is easier to prevent something than it is to repair the damage. This sentiment holds true to professional growers’ integrated pest management (IPM) strategies. Indoor grow rooms should always be free of loose soil, standing water, and leaf material. During a full grow cycle, there may be some stains on the floor or dirt accumulated in the corners. It is good IPM practice to clean the room between each cycle.
Cleaning products specific to cannabis grow rooms can be purchased, but the common cleaners are diluted bleach or cleaning vinegar. Wipe down everything from the walls to your soil containers to the shovel you use to scoop soil. Indoor grow rooms with a recent pest infestation should take extra measures, which may include not growing for up to a month to break the unwanted pests’ life cycle. You can learn more of these crop-saving tips in our article – How to Clean Your Grow Room.
Final thoughts on building a grow room
Designing a custom grow room for cannabis can be exciting. Now that you’ve read this article, you should know the many aspects to consider when designing a grow room and have the knowledge and confidence to make those choices.
If faced with a large blank canvas like an open room inside the house, I would use large grow tents instead of customizing the room. That is not always an option for growers due to availability or budget, and that is why we’ve created this article for designing an indoor grow room.
Remember, different areas of the house can call for different construction materials, tools, and techniques. Fortunately, we have specific articles for each of the main areas people grow. We also cover how to build a DIY grow tent if that is your preference. Regardless of where you decide to grow, for security purposes, cover the smell, block the light, and reduce mechanical noises that can give your grow away.
Designing the right grow room today can be the reason for future success. When a cannabis grow room is dialed in, all you need to do is grow like a pro. If you want to grow like a pro, all you need to do is download Roberts Grow Bible for free and get started on becoming a master grower.
Please let us know if you found this article or any other linked articles helpful in planning your grow room. Is there something we missed? We’d love to read your thoughts in the comment section. Have fun with your design plans, and happy gardening!
So you have a basement and a dream. What’s next?
When people think of home growing, they immediately jump to growing in a closet or a tent. While that’s feasible and possible, those with space in their basement might want to make the most of it.
Although it can be rewarding, building a grow room in a basement takes a lot of thinking about the equipment you’ll need and the environment you want to create for your plants. Basement grow rooms can allow for enhanced security and easier light control. However, the downsides include humidity and cleanliness issues and infrastructure problems.
Are you curious about building a basement grow room? We’ll walk you through the good, the bad, and the different considerations to remember.
The pros and cons of growing cannabis in your basement
Upsides of growing cannabis in your basement
Growing weed in a basement lends itself to many upsides concerning traditional worries about cultivation, such as stealth, ventilation, light control, and pest management.
Regarding stealth and security, a big worry with growing at home involves people smelling and hearing your grow. A basement grow provides odor control and noise reduction by being directly underneath your home. With suppressed odor and noise, the likelihood of anyone detecting your grow or attempting to steal your crop is significantly reduced.
Environmental control is a massive and essential part of making the most of your grow from a plant health and yield standpoint. Basements tend to run cool and damp, both of which are usually a problem when it comes to cannabis, but with the proper preparation, you can make this an advantage. Dehumidifiers and heat mats will be your friends in cool, damp environments. Cool temperatures from the floor can stunt root development, and moist environments make a hospitable environment for pathogens like powdery mildew.
Another beneficial aspect of growing weed in a basement is that basements typically don’t have windows. This simple fact significantly reduces the possibility of light leaking into the room and messing up your veg or flower cycles by shocking your plants in their night periods.
Downsides of basement cannabis cultivation
Considering the challenges and inherent issues you’ll face with using your basement for an indoor grow room is just as important as considering the benefits. Again, basements often have more moisture, making them susceptible to mold and bacteria growth. Use fans to circulate the air and dehumidifiers to control the extra dampness. It’s essential to keep fresh air and prevent harmful matter from growing on your indoor cannabis plants.
You need to address infrastructure challenges to make a proper grow space out of your basement. Unfortunately, establishing adequate water supply, electrical outlets, and heat sources can be demanding. However, overcoming these challenges is essential to provide indoor cannabis plants with the resources for healthy growth.
Unlike a traditional indoor grow room, basement grow rooms tend to be cooler, which can slow down plant growth and cause a shock to your roots. To build a DIY grow room under your house, you must optimize your plant’s climate to produce high yields and top quality. You’ll also need to consider how to make it warmer in your basement, like using heaters or considering the type of light you use – such as whether or not it generates heat.
If you want to read the basics about starting your grow, please sign up below to receive our grow bible and weekly grow tips and seed deals!
Designing and building a grow room in your basement
Basement grow room design can be separated into equipment and infrastructure. Sure, equipment planning is necessary for any grow space, but you’ll need to take special considerations when dealing with a basement environment.
When you build a grow room, the most prominent points to consider for basements are ventilation and humidity. The best way to maintain these two growth pillars is with dehumidifiers, fans, and filters.
Dehumidifiers, fans, and filters will help keep your space optimal and your plants happy— Especially the carbon filter, which can help keep most of the odor inside your weed grow room. Most other concerns for the room are infrastructure-based and centered around prepping and sealing your room.

CO2 enrichment for your basement grow room
Additional growth supplementations are a typical consideration when growing cannabis. CO2 is a perfect solution for boosting your plant’s growth. It also helps boost your plant’s photosynthesis process. You can use CO2 in a basement grow. Ensure you maintain proper ventilation around your room when supplementing CO2 and keep your ppm between 1000-1500.
Proper climate control and ventilation are key for a basement grow
Basement grow room ventilation will be a top priority for your grow room. Basements are typically deep underground and sealed to separate the environment from the floors above them or areas like closets. To encourage good ventilation, consider placing fans in different regions of the room. This helps keep your canopy from dead zones that make the perfect environment for pathogens. Aside from pathogens and pests, having fresh air move through your canopy helps encourage the growth of stronger branches.
Have a separate space for the vegetative and flowering stage
A basement grow room can be set up in a few different ways. You can set up a multi-room basement into separate flower and veg rooms, or you can veg or flower simultaneously in a single-room basement.
Tents are another option for creating different environments for veg and flower plants in the same room. Even if you’re using two separate rooms, ensuring they’re sealed off is essential. Remember, each cycle has specific light requirements, leading to the potential of causing veg plants to pre-flower by exposing them to too much light.
Make the most of any available space, but if you want to grow plants in both their veg and flower stages, it’s smart to keep them in separate spaces. Here’s why: having different areas to grow your veg and flower plants lets you do “perpetual” growing. That might sound like a fancy term, but it isn’t all that complicated.
Here’s how perpetual growing works: In one portion of the grow room, you’ll grow veg plants to the size you’re comfortable with before transferring them to a grow tent where they’ll flower. Once those veg plants are out of that space, you’ll replace them with new veg plants that will grow at the same time as your flowering plants.
As your veg and flower plants grow, you’ll begin harvesting your flowering plants and hanging them up to dry. As you pull these plants down, you can transfer your vegging plants to the flower tent and start the cycle over again. This flow ensures that you constantly have flowering plants to harvest and continuous product coming in.
The importance of a clean environment when doing a basement grow
When it comes to the environment of your basement grow room, it’s imperative to consider the cleanliness of your basement as well as your ability to ensure your grow is as pest and pathogen-resistant as possible.
Contamination can happen quickly if you don’t efficiently clean your space and supplies. Mold, heavy metals, and other bacteria can form and pose significant risks to your growing marijuana plants.
If you’re planning to grow in tents, clean both the inside and outside of your grow tent with a mixture of one part 30% hydrogen peroxide and one part water. This mix ensures it’s strong enough to kill pathogens and light enough not to harm your plants or your body, should you get it on your eyes or skin. Safety is a priority!
Another aspect of keeping a clean environment is ensuring you minimize the possibility of bacteria and pests by using an Integrated Pest Management plan. If left unchecked, you can attract mites, fungus, mildew, and other preventable ailments to your plant, but not if you have the right plan! Need supplies? ILGM makes a line of tailored preventative feed solutions to keep your plant safe against threats.
Check out Robert’s Plant Protector series for your IPM needs!
Bergman’s Plant Protector
- Protect your plants from diseases and harmful pests.
- Consists of three 20 ml bottles
- Enough plant protection system supplies for up to 20 plants
- Suitable for soil, hydroponic and all other grow mediums
Final thoughts on basement cannabis cultivation
Embarking on a basement cannabis cultivation adventure offers opportunities and challenges. The advantages include enhanced security, precise light control, and potential stealth. The challenges are the environment.
While dampness in basements can be a concern, you can mitigate it with tools like dehumidifiers and heat mats. Excess moisture invites mold and bacterial growth; adequate ventilation and dehumidifiers help maintain a healthy growing atmosphere.
Crafting an efficient basement grow space requires meticulous planning of equipment and infrastructure. Addressing infrastructure needs, such as water supply and proper heat sources, is fundamental for a successful setup. Prioritizing ventilation, humidity control, and cleanliness is also essential.
Your basement can evolve into a thriving environment for cannabis, provided you embrace safety, hygiene, and climate control. Have more questions about growing indoors? This article is part of a comprehensive series on optimal indoor cannabis cultivation.
Happy growing!

Does Lizzo Consume Weed – The Fresh Toast

Do Delta 8 Edibles Work For Female Arousal?

Could You Help Your Lips With CBD Balm

California Awards $12 Million In Local Cannabis Equity Grants To Repair Drug War Harms

Patient Zero for Untreatable Depression Begins Groundbreaking Psychedelics Therapy

Mother’s Day weed gift guide 2024

Key Things To Know About Hemp And Marijuana Drinks

Indica, Sativa, Hybrid & More

A Deep Dive into the Benefits of Medical Marijuana for Mental Health

Canada’s medical cannabis exports jump to CA$220 million as domestic sales fall

Distressed Cannabis Business Takeaways – Canna Law Blog™

United States: Alex Malyshev And Melinda Fellner Discuss The Intersection Of Tax And Cannabis In New Video Series – Part VI: Licensing (Video)

Drug Testing for Marijuana – The Joint Blog

What you Need to Know

Cannabis, alcohol firm SNDL loses CA$372.4 million in 2022

NCIA Write About Their Equity Scholarship Program

City Of Oakland Issues RFP For Employee Training Programs

It has been a wild news week – here’s how CBD and weed can help you relax

A new April 20 cannabis contest includes a $40,000 purse

UArizona launches online cannabis compliance online course
-
 Cannabis News1 year ago
Distressed Cannabis Business Takeaways – Canna Law Blog™
-
 One-Hit Wonders1 year ago
United States: Alex Malyshev And Melinda Fellner Discuss The Intersection Of Tax And Cannabis In New Video Series – Part VI: Licensing (Video)
-
 drug testing5 months ago
Drug Testing for Marijuana – The Joint Blog
-
 Cannabis 1011 year ago
What you Need to Know
-
 Marijuana Business Daily1 year ago
Cannabis, alcohol firm SNDL loses CA$372.4 million in 2022
-
 Education1 year ago
NCIA Write About Their Equity Scholarship Program
-
 Education1 year ago
City Of Oakland Issues RFP For Employee Training Programs
-
 Cannabis1 year ago
It has been a wild news week – here’s how CBD and weed can help you relax